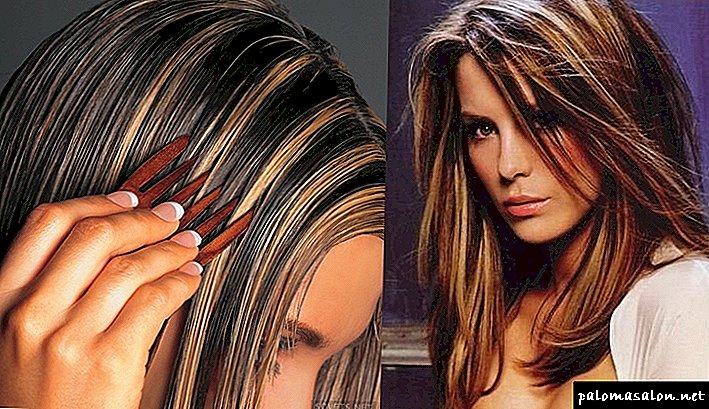
There is hardly a girl in the world who would not want perfect wavy hair without spending much time and having to go to a beauty salon.
If nature has not rewarded you with curly hair, there is many ways to curl them. Of course, it is quite simple to do it with a curler or curler.
But, if you prefer not to resort to heating the hair and thereby reduce the harmful effects of high temperature, you can use these original methods of twisting the hair.
1. How to wind short hair with the rim
· Wrap a small section of hair under the bezel. Take the next strand of hair and capturing the previous strand, wrap them under the bezel.
· Repeat until you twist all the strands around your head.
· You can leave your hair for a while while you are going to gather or do everything before bed and leave it all night.
· Remove the bezel to release the curls.
3. How to wind your hair with sticks (video)
· Split the hair in the middle, tying one side into the tail, and securing the other side with a hairpin.
· Spin tail around the sticks.
· Then turn the wand and pass under the gum.
· Do the same on the other side.
· To keep your hair better, run the sticks under the tail from the opposite side.
· Tie sticks with rubber bands for more strength.
· Leave overnight.
· When you remove sticks and gum, you can enjoy chic curls.
4. How to wind your hair with a flat iron
· In this method it is important to know how to guide the iron.
· Pinch the hair strand at the roots with the iron so that it is pointing down.
· Then twist it away from your face as you slowly lower it down.
The more casual the hairstyle looks, the better.
5. How beautifully wind the hair, highlighting the waviness
· Split slightly wet hair into 2-4 strands, and twist each strand in or out.
· Curl your hair while it is dried naturally or with a hair dryer.
· When the hair is dry, fluff the hair.
· This is an easy way to create soft natural waves on the hair.
If you have straight hair, and you want to twist them slightly, twist, as shown, and fasten the ends in front with a hairpin or a rubber band, as if you made a necklace out of hair.
6. Twisted hair on hairpins (photo)
· Spray bottle with water
· Means for laying
- Moisten dry hair with water and apply styling products.
- Wrap a strand of hair around your fingers away from your face.
- Secure the curl with stealth.
- Repeat with the rest of the strands.
It is best to leave invisible at night, and in the morning to remove them and unleash the strands.
7. How to wind the hair without curling using the "donut"
· Cut off the front of the sock and fold the rest into a bagel.
· Thread the hair in a bagel.
· Start wrapping the tail around the sock until you wrap the hair in a bun.
· Fix the tip of the hair with stealth and leave for the night or for several hours. If you leave for the night, tie a bunch higher so that it does not interfere with your sleep.
· It is also possible to simply fold the entire tail into a bun.
In the morning, dissolve your hair and you're done!
8. How to curl curls with paper towels
· Wash and comb your hair.
· Cut paper towels into strips of 5 cm and twist the strands as if you were twisting on curlers. The smaller strands, the more curls you will have.
· Tie the ends of the towels so that your curl is held at night.
· Go to bed, and in the morning you will have beautiful wavy hair.
Here is another way to wind your hair with paper towels.
9. How to wind your hair with a T-shirt
· Select a styling agent.
· Take a t-shirt with a short or long sleeve.
· After having washed your hair, apply styling product on damp (but not wet) hair.
· Use a comb with large teeth or hands to untangle hair.
· Place the T-shirt on a flat surface.
· Bend the head, lowering the hair down to the center of the shirt.
· Then wrap the bottom of the T-shirt around the head, securing it to the back of the head.
· Cover and wrap the head of the T-shirt with the sleeves at the front.
· Leave on from 30 minutes to several hours or overnight.
· When your hair is dry, you will have beautiful wavy curls.
Bonus: How to quickly wind your hair in 5 minutes
First spray heat protection on dry hair.
Make a "spring", securing two invisible on both sides of the hair tie.
Collect the hair in the tail, fasten one stealth one side, wrap the elastic around the tail a few times and fasten the second stealth tail.
Twist the little strands of the tail with a curling iron.
Remove the invisible and free gum, and you can enjoy your curls.
Advantages of use
 Always at hand. Fabric, paper, foil can be found in any home. Production time is about 15 minutes.
- Speed of use For bulk, large curls will need a maximum of 10-20 minutes. on twisting.
- Use for the night. While you sleep, the hairstyle is in the process of developing. In the morning you can sleep a little longer, because the installation is almost ready. Remove home curlers even easier than screwed.
 Always at hand. Fabric, paper, foil can be found in any home. Production time is about 15 minutes.
In no case after unwinding the curls do not comb your hair with a comb. The curls will lose their shape and will multiply in volume. Romantic image will be replaced by the similarity with the poodle. Carefully straighten the curls with your hands, dividing it into several small curls. Large curls are generally better not to touch - they themselves beautifully lie.
Application tips
- Homemade hair curlers are often used for curling children's hair. They do not require additional funds in the form of varnishes and gels. Little ladies are crazy about beautiful small curls. Mom is not difficult to wind her daughter's hair in the evening and put the baby to sleep. For long children's hair (for small curls) you will need 30-40 papillotok. Learn how to harm your child’s hair without harm on our website.
- To give lightness and airiness to the image, women use home curlers of large diameter. Small curls will not suit everyone. You can twist the tips of long hair using 10–15 curlers. Quickly, easily, with a minimum of wasted time and effort. If you need small curls, do not do without outside help.
- It is necessary to carefully curl the hair near the face. These curls will set the tone for the entire hairstyle. Curls will fall down and will beautifully lay down on their own. Remove the curlers to the bottom of the curls, located closer to the ears and the back of the head. So small lower curls will not be confused.
- If the curls do not hold, use cosmetic wax. Not to be confused with the gel! For a long, thick hairstyle will be enough volume with a pea. He does not glue the hair, the hairstyle will be alive. Curly hair will remain unchanged during the day. Jars lasts for 1-2 years.
Important! Varnish or wax should be applied before forming each curl separately. Styling products dry quickly (especially varnish). Glued hair is difficult to disassemble into strands. Read more about the tools for creating and fixing curls, read on our website.
How to make and use
When making curlers at home, you adjust the diameter of future curls. Production will take about 15 minutes. You can use up to 20 times. It is possible to wind in the evening and go to bed in peace. A lot of tips on how to wind wet hair at night, you will find on our website.
Need to:
The cloth. Take a non-slip, closer to x / b. The knot from synthetic fabric will easily untie and the curl will disintegrate. Do not use tapes, knots of them are easily decoupled. Waking up in the morning without a pair of ready curls will be insulting.
We cut the fabric into strips 25–35 cm long and 1–2 cm wide.
Sequence:
Place the end of the strand in the middle of the fabric and twist the hair until it stops. Fix the strand by tying the ends of the fabric on the knot.

From paper and fabric
Using paper and fabric curlers we get soft, light curls.
Need to:
- The cloth. Similarly, take a non-slip, preferably x / b. Well, if the fabric stretches. An old, unnecessary soft knit T-shirt.
- Paper. The newspaper will leave traces on light strands. It is necessary to use notebooks (clean) or office paper.
We cut the fabric into strips, 25–30 cm long, 1–2 cm wide. We cut A4 paper or a sheet of notebook along the length of 5–7 cm wide (small curls), 9–13 cm (large curls). Fold the strips in half. We wrap the paper in the middle of the fabric roll. For curls from 3 cm - paper, you need several layers.
Important! After spinning the curls, do not use fixatives. Moisture will weaken the springiness of the locks (small and large) and the hair will spoil.
At the first use, the paper should be slightly moistened with water, press down and allowed to dry. It will become softer, stop unwinding. This will simplify the process of winding hair, paper is stiff and soft hair will crumble. Do not moisten paper when reused.


Sequence:
Spin the hair in the inner side. For curls along the entire length, wind from the tips to the stop. Hold your finger at the base, stretch the fabric, tie a knot.
If soft waves are needed, we form strands weakly, avoiding dragging.
Need to:
Foil rectangles with sides of 8 to 18 cm. Inside, place the cotton wool, twisted with a cord, fix. This option curlers is easy to use.
Note, do a perm with the help of foil curlers faster than fabric. They do not require a tie, fixed by compression.
Sequence:
Place the strand in the center. Leave 5 cm and start winding. First 5 cm around the foil. Then turn the foil itself, winding up future curls. Secure strands by compressing the foil. To get large curls, you need a large amount of cotton.

From foam rubber
Cut the foam rubber into strips of 20–25 cm. Thick foam rubber (from 4 cm) - large strands, thin (up to 2 cm) - flirty small curls. For long thick hair will need approximately 10-12 bands.
Sequence:
On the center of the strip we wind 5 cm of the selected strand. Spun under the bottom of the remaining hair. Hold with your finger and form a knot.

Foam Locks - Spiral Curl
Need to:
For long strands, the length of the strip is 18–20 cm. The diameter of the curls depends on the width of the strip. Width 2–4 cm - small curls, 5–7 cm - large strands. It is necessary to take a strip and cut along the length, not cutting to the edge of 2-3 cm.
Sequence:
When using locks, hair should not begin to wind with the ends of the strands, and closer to the roots. We get a lock in a section. Wrap evenly over the entire length. The tip is fixed by elastic. Curls, curled in a spiral, look gorgeous at different lengths of hair.

Make a gorgeous hairstyle, through home curlers, can every hostess. The result in the form of springy strands will please the eye. To create a unique image of the daring “Curly Sue” or the romantic Jennifer Lopez, you no longer need to go to the salons and spend a lot of money on styling.
Learn more about curling hair at home thanks to the following articles:
Useful videos
How to make curls without curling and curlers.
Curls without harm to hair.
Papilotki
The use of such hair curlers can be a real adventure for your hair. Because they are made of scrap materials.

Most often for this purpose use pieces of cloth and paper. How to make a curler-papilotki?
- Hair is wound on paper strips.
- Fasten papilotki with pieces of cloth.
The size of the curls will depend on how wide you make the strips of paper. Hair will need to unwind gently so as not to damage the strands. Treat the received curls with styling products.
Boomerang curlers: how to use
The boomerang curlers in their form resemble a long roller made of foam rubber or rubberized material with a thin wire inside the curler. Boomerangs bend well and therefore keep strands well in the right position.
Curls created using such flexible curlers for a long time retain their original appearance. Using them is simple: wrap the strands around the product and connect the ends of the boomerang.
Thickness and thickness of curls depends on the number of boomerang curlers used. But their main advantage is that they are soft and it's nice to sleep in them. Therefore, many girls prefer this option because of the pleasant material and firmness of curls.
Magic curlers
The girls want their curls to not lose their shape for a long time, they look natural, and the hair structure should not be injured. All the listed criteria correspond to magic curlers (magic leverage). This product recently appeared on the market and immediately won the sympathy of girls and women.

These are spirals of bright colors, for the manufacture of which thin silicone is used. Inside it there is no wire frame. Also in the set there is a special hook, which you pick up the strand and thread it. Magic curlers differ in diameter and length. This allows you to create beautiful curls on the hair of any length.
Advantages of magic curlers:
- ease of use
- wounding hair injury - minimal,
- reliable fixation
- do not leave any creases - curls look natural,
- Curls retain their shape for a long time.
But do not think that this magical device does not hurt the hair at all. Because of the stretching and threading of the locks through the hook, they still get a negative impact.
But compared to other types of curlers, they occupy one of the first places on the safe use. Sleeping with them is uncomfortable, because the spirals are in limbo. But all this is offset by the listed advantages.
Velcro curlers
Almost every girl has velcro curlers. They are convenient to use, compact. It is easy to create a voluminous hairstyle with their help; curls are obtained without creases.

These are cylinders with a “spiny” surface, thanks to which clamps are not required for their fixation.
Because long hair can be very confused - accordingly, no beautiful styling will work. Just stickies do not leave for the night - due to the lack of clamping (if you need curls without creases), they can unwind.
With the help of such hair curlers a girl can create bulk styling in a short time, and owners of curly hair will be able to make their curls more even and docile.
Therefore, if you have healthy curls of suitable length and you need to make a beautiful styling in a short time, then you should take a closer look at the Velcro curlers.
Electric curlers
Electric hair curlers are a modern and practical way to create beautiful curls. Heating is due to electrical current. The heating element is built in the special case. On curlers there is a metal side, conducting heat to the inside to melt the wax.

Electric curlers come in different diameters, which allows you to create curls of different sizes.
Which electric rollers are better?
- Ceramics is the most expensive material for electric rollers. The high cost is due to the fact that ceramics prevents overheating. Therefore, they are also called gentle.
- The ionic coating prevents hair from tangling.
- The covering from velor provides stable fixing of electrodrivers in the necessary position.
Electric curlers are a great opportunity to create curls using modern technologies.
Thermo curlers
This is another kind of curlers that with the help of heat create curls. The difference from electric is that they need to be dipped in boiling water or hot water.
 Inside they have a wax core, which heats up simultaneously with the heating of the curler.
When the wax cools, it begins to give off heat to the hair, thus creating curls.
How to wind hair on hot rollers? Nothing complicated: the steps of curling are the same as when using conventional products.
An equally important question is: how long does hair curlers keep on hair? On average, 15-20 minutes, you need to remove them, when they are completely cooled, to make beautiful curls.
 Special love deserved curlers with velvet or velor coating.
Made from this soft material, they do not hurt or tangle the hair at all, which makes them safest to use.
A large number of through holes allows the chopsticks to securely lock the strands in the desired position.
Metallic
This is one of the most ancient varieties of curlers. With their appearance they resemble velcro, only made of metal.
 They consist of two parts: a metal body and a rubber tuck for fixing the hair.
But to remove such curlers is not easy: for this you need a special wand, which can be bought separately or together with hair curlers.
If you decide to create curls with metal curlers, then you will need a lot of time.
These products should be wet hair. Strands can dry for a long time, so they are often used in salons, where it is possible to dry your hair with a professional hairdryer.
Therefore, it is better that the hair dry naturally or use such hair curlers in beauty salons.
Plastic
These curlers are hollow cylinders with spikes, due to which the stranded strands are not displaced. Also included in the kit mounts - plastic mesh, in the form of a semicircle (or just elastic), which are worn over the curlers. The curls made with their help keep their shape for quite a long time.

The significant disadvantage is that they can not sleep. Also from the clamps remain creases, because of which the curls do not seem natural. To remove such curlers should be carefully, making sure that the hair is not tangled on the spikes and protrusions.
Horizontal styling
This type of styling is recommended for curling hair on certain types of hair curlers:
Below is a step-by-step instruction on how to perform horizontal curling.
- On freshly washed strands, apply the tool to create a styling.
- Hair should be divided into several parts: parietal and two lateral.
- The curl must be started from the parietal part. Take a strand on top.
- Place it vertically so that it is perpendicular to the crown, comb it.
- Begin to twist the strands in the direction from the forehead to the crown.
- Strands should be twisted with the same force to the very roots - so, on the received curls there will be no wrinkles.
- Wind the middle part of the forehead to the neck so that there is one line of curlers.
- Next, proceed to the strands of the temporal part.
- When all the hair will be curled on a curler, blow-dry it if you used a styling agent.
- Proceed to the spinning strands after complete cooling from blow-drying.
- You need to unwind the hair from the bottom up. Combing curls must start from the ends, gradually rising to the roots.

Vertical waving
With this technique, strands begin to wind from the lower hairline near the neck.
- Make the tail on top.
- Separate a wide strand on the back of the head with a horizontal line.
- Divide it into narrow strands.
- Screw them on the curler in the vertical direction.
- The rows of curlers should be horizontal. The remaining steps are similar to horizontal curling.

Spiral
This technology is suitable for spiral curlers, magic curlers or papilotki.
- The hair is divided into four broad strands: parietal, occipital and temporal.
- Additionally, divide them into thinner ones.
- Twist the strands spiral.

General rules for curling curlers
To curls turned out beautiful, you need to follow simple recommendations.
- Curling on wet hair is more resistant, so moisten it before wrapping. It is not necessary to moisturize the strands, if you are using thermal rollers and electric.
- The thinner the hair, the thinner you need to take strands for winding.
- Do not leave the curlers for longer than an hour - it hurts the hair structure.
- Spin the strands only after they have dried completely, disassembling the curls with your hands. Only need to do this carefully.
- Do not stretch the strands when curling too tightly.
Some hairdressers believe that hair curlers should not be twisted on wet hair, but everyone agrees that it is necessary to curl just washed hair. Most professionals use packing tools before wrap, as in this video:
How to wind hair of different lengths
To make the curls seem natural, you need to use products with different diameters. To curls turned out perfect, you need to take into account the length of the hair when curling.
- What are the need curlers for long curls? Spirals are ideal. If you use cylindrical curlers, then for fixing need additional clamps. It is better to do a spiral curl.
- Which curlers better for medium hair? For this length, fit almost all types of curlers. It is better to choose products of medium diameter. Perm should be done in a vertical way.
- For short length hair fit hair curlers, stickies, papilotki and boomerangs. Products should choose a small diameter. Curls at this length will not work. Hair curlers for short hair help to give volume to a haircut. Curling is done in a horizontal way.

Knowing the subtleties of curling hair with curlers, you can create beautiful and spectacular curls.
Types of curlers for different types of hair
We will talk about how to choose the right curler for different types of hair and with maximum effect.
- Thermo curlers
It is important to know! For those who by nature have thin and tangled hair, hedgehogs will not be the best solution.
It is important to know! Remember that after the bobbins your hair is difficult to comb.

Laying haircuts bob caret on curlers, however, like any other haircut will help add to the image of romantic notes
So, we looked at what tools to choose for different types of hair, it’s time to learn how to style your hair with curlers.
All about laying with curlers
Laying with the help of curlers will be successful only if you responsibly approach the choice of tool and method of curling. There are horizontal and vertical ways, which are predetermined by the placement of hair curlers on the head.

Approximate diagram of horizontal and vertical curling method
- Horizontal. This method makes it possible to add hair pomp and missing volume. The strand of the desired diameter must be perpendicularly pulled from the surface of the head and twisted in the opposite direction from the growth of the hair.

Horizontal curls only emphasize your femininity and individuality.
- Vertical. It is used to create the sensation of "descending" curls, without grabbing hair near the roots. Suitable with a minimum length of hair from 12 centimeters.

Using the vertical method you can easily create cute and mischievous curls
Recommendations
In order to create the perfect hairstyle with your own hands, you will have to exert a little effort and acquire some skills in working with curlers.
Patience and perseverance - the price of a stunning image.
- Before winding, separate the hair strands with a width not exceeding the size of the curlers and cover them with a styling agent. This will help preserve the original appearance of the hairstyle for a long time.
- Laying on hair curlers on medium hair or short haircuts must be performed only on perfectly dry hairs. Other types of curlers are applied on wet.

To make the curls better formed, let the hair dry completely.
- Boomerangs, loxes, bobbins are removed only after complete drying of the hair.
- If you comb the curls about 20 minutes after curling, they will retain their shape longer.
- Use larger curlers to handle bangs, smaller ones for the neck and side strands.
Time experiments
If your goal is long-term laying on large curlers - you can try the carving technique. It will provide you with stylish curls for a long time and eliminate the need for daily manipulations with the head of hair. In contrast to the standard perm, carving means affects only the surface of the hair, it more gently affects the state of the curls.

An example of a successful carving in the photo
In what situations can you try carving technique?
- When you are the owner of thin and naughty strands. After the procedure, they will acquire the missing volume and waviness.
- If you have oily haircarving as if "dry" them.
- For those women who are tortured to lay hard and unruly curls.
- For busy girlswho have no time for daily procedures to create complex hairstyles.

Carving will help solve the problem of thin, expressionless hair
But, like any other procedure, carving has its own contraindications, which should be read.
- Highly bleached or newly colored hair.
- During pregnancy and breastfeeding.
- Dry or brittle hair.
Finally
We sincerely hope that our instructions will become a useful guide for you when creating a new exquisite image. The main thing, do not forget that everything is good only in moderation. Sometimes, our hair needs a little rest from the constant curls or styling, so sometimes give them the opportunity to "relax."

Whatever the length of your hair, curlers will make their appearance breathtaking
The use of curlers will be able to qualitatively update your image, adding to it brightness and a touch of romance. Do not be afraid to try new shapes, diameters or views to create the perfect styling. For more information on the subject that interests you, we recommend that you read the video in this article.
Method 1: many patches
To properly wind the house, you should follow the step-by-step instructions:
 Necessary accessories
Using water (sweet water, foam), comb your hair. Select the first strand. Follow the steps.
 Stage 1
  Stage 2
Repeat the same steps with the rest of the curls. Go to bed (if the process took place at night). If the hairstyle is needed in the evening, then this can be done in the morning and walk around the house with rags on the hair all day.
 Expectation
Unleashing the knots, release the curls from the scraps. It is worth starting with the lower strands.
 Ready hairstyle after promotion rags
For quick winding this method is definitely not suitable. It will take at least a couple of hours. As an option - to wind on wet hair, and then dry it well with a hairdryer. The use of a fixer (lacquer) is mandatory, as the resistance of curls will not be strong.
Method 2: one shred
Suitable for long hair or medium length. It’s easy to do this with your own hands. No harm this quick method to make curls will bring. It is optimal to withstand about 2 hours. You can and use wet hair, but after that they must be dried with a hairdryer.
Lift hair at the roots in this way will not work, but the tips will be effectively curled. Such training can be the basis for further hairstyle: Greek, French braid, etc.
For winding, only one flap is needed, at least 40 x 40 cm. If the hair is long, then one side of the shred may be longer, so that later both ends can be joined into a knot. Also use a scarf for such purposes.
 First stage
  Second phase
  Third stage
It is good to comb each strand with a comb so that when you wind it up your hair will not be tangled. If you curl curls tangled, then quality curls will not work. Curls will not turn out fine, but doing it to yourself is very convenient.
 Stage 4
It is better to wind hair in a spiral and tight so that it does not lie on each other in layers. This will ensure evenly curled locks.
 Stage 5
After the end of the winding, fix the ends of the hair on the shred with a small rubber band. Then repeat the same steps with the second part of the hair. It is inconvenient to sleep with such a design on the back of your head (it is better to adhere to the vertical position of the body), therefore it is recommended to twirl the curls in the morning in order to get volumetric curls in the evening.
 Final result
This method is suitable for twisting the hair of a child. For the express method, to make curly hair, use foam, and then dried with a hairdryer. Next, fix the effect of varnish.
Method 3: scraps and paper
In fact, the process of curling hair is similar to what was in 1 method. The only difference is that in order to curl hair, simple shreds are replaced by other home-made blanks. It is as convenient to wind up on pieces of paper as it is easy to shred.
 Winding blanks
Due to such blanks with paper (you can use foil, napkins), the hair is not tangled on the fabric, which does not damage them. It also allows you to not make the curls too small and tangled at the tips (if winding occurred from the ends). Also spinning on the tubes for juice. Then take narrow shreds and thread them into a tube (take a length of up to 5 cm). Curls on tubules are spiral and rather elastic.
Unusual, but effective way to achieve fashionable curly curls. Especially suitable for hair from medium length and more. In order to get cute curls, you need a t-shirt.
 T-shirt wrap up step by step
Initially, the T-shirt is rolled into a braid. Connect both ends, turning it into a kind of wreath. Put the workpiece on his head, and then alternately twirl the hair (each individual strand), starting from the face (according to the principle of Greek hairstyle).
Cheating curls occurs until the last strand is woven. Waiting will be easier if you do your hair before bedtime. It is comfortable to sleep with such a blank on your head, nothing interferes with a full sleep.
The next morning you need to stitch everything. The effect will please with its natural look. It is not a long time to make curls, but in order to curl beautifully, you should not hurry and take large strands. The smaller they will be, the more beautiful and neater curled curls will be (you get chic, big and light strands). To last longer, use lacquer.
"Plait of hair"
This method is very simple, does not require any blanks. Curl curls intensively fail, but to achieve careless curls get exactly.
The harness is formed from a bundle of hair (tail on the back of the head). To make more intense curls, make a tourniquet stands for the night.
Braid harness will, if you follow the detailed instructions. To begin with, tie the hair into a ponytail. Divide hair into two parts.


Then twist each strand (with one hand one and the other with the other), twisting them in parallel with each other. The result will be such a result. 
Such flagella on the hair will help to get curly hair, the curls of which will not seem "doll". That is, you can get a natural look of curl hair.
To the result from the harness was more vivid, such a hairpin should hold at least a few hours. It is advisable to moisten the hair slightly before making a tourniquet.
Twisting the hair, you can get wavy hair. This method is suitable winding on long and medium length hair.
The result was natural, beautiful curls without curlers. The smaller the curls of the flagella, the more small curls will be obtained.
"On the studs"
This method is especially suitable for women who are trying to add volume to their hair. Thus, it will not be possible to make curls, but to make curls wavy it will turn out unequivocally. With that, the waves come out small and funny.
The twisting of the hair in this case occurs on the studs, so you need to prepare in advance the necessary amount.
Curling on the studs will require some patience. But the effect of "afro" or "corrugation" will not disappoint anyone, because such a setting makes a lot of overseas stars.
Prepare a hair is worth it: thoroughly comb and spray varnish. Thus, the strands will work out for a long time, they will not unwind under the first wind.

 The scheme of winding the curl on the hairpin

Next is to be patient and perform such actions with each strand. The result will be the following.

Such a twist for the hair will make curls lush, so you will not need corrugation tongs. Hold the hairpin on the hair need about an hour. If you hold for 20-30 minutes, you get a not so intense result. Then you need to begin to unravel the hair. Start better from the bottom of the head.
You can curl curls nicely and quickly, making the basis for putting them together beautifully. Men use this method. Suitable cheat on the square, but for very long hair, the studs do not fit, they will be small. Then use special sticks that will help to curl curls beautifully quickly and help make the waves on the hair independently.
"Curls on socks"
Curls make for long hair, or at least for medium hair with the use of available tools. You can get light waves, but curls are better obtained if you do them at night. Twist the hair to get soft curls, you need to socks! It may sound unusual, but a sock is a great tool to wind beautiful curls.
The method of winding is similar to what happens on shreds. A better effect can be expected when doing the curling of the hair is not saturated or moisturized. Making wavy curls with socks is easy if you follow simple steps. The main thing - to find a sufficient number of socks.

Repeat these steps with other strands. Choose locks of the same size, so that the effect was then even, tie the socks on a single knot. More curled hair will be obtained if you use varnish before winding. Winding can be done both up to the roots, and up to half the length of the hair.

After a couple of hours of waiting, you can unwind the hair. That's what happens.
 Twist result
Spectacular hairstyle can be obtained by doing a curling hair cascade. Celebrity-like styling is demonstrated at cocktail parties and red carpet.
"Curls of braids"
You can get curled hair, if you hope for a pigtail. And this is not in vain. Here the main thing is to properly braid the braid. It would be stupid to look if you make a regular braid from the neck. To get uniform curls over the entire length of the hair, you should braid the "spikelets". The more they will be, the more broken hair lines will come out.
 Effect after two spikelets
To get attractive curls on the pigtails, you need to choose the right kind of weaving. Ideal results are obtained from the French braid.
 Kind of weaving, which produces a good effect
The beauty of this hairstyle is that having walked with beautiful weaving all day long and having slept with it at night, in the morning you can untie the hair and get a new styling.
"Curls of the tail"
Often curled from the tail curls or ironing on the hair curlers. Many see the simplicity of scrolling on locks, strings. Messy, but stylish spiral curls with little effort can be obtained by the beam. Although the hair with curlers will look neater, but the curls of the tail require less preparation.
 Expected Result
Having collected hair in a tail, we make of them a tight tourniquet and wind it with a base - an elastic band, so that we get a bundle. Secure hair ends with a hairpin.
 Having dissolved such a bundle, light waves are produced on the hair.
Spectacular curls are obtained after using a roll for bunches or bagels. To get a more intense result, when creating a beam, you need to tighten the hair tightly.
Homemade perm
To decide exactly what suits you, consider what kind of curlers with your own hands you can do at home. However, in most cases you will have to try all existing ones. After all, the length of the hair and their structure for each of us are individual.
Use of available tools
When using any of the curlers listed above, the main condition should be considered: whether homemade products are suitable for your hair length. Medium owners have nothing to worry about - you can do anything with them. But to come up with something with a short haircut will be a little more difficult.
Having clearly defined how to make curls at home, proceed to create your own device for curls. Note that homemade papilotki and other devices must be maintained on the head for a long time. Only in this case, graceful waves or small curls will last longer.
The best option is to curl the curls at night, so that the next day bring the hair in order.
Styling mousse, pre-applied to the strands, will help you get a more lasting result. But remember that its quantity should be very moderate.
What to do curlers
 Our grandmothers were able to do curly curls with the help of seemingly completely unrelated things many decades ago. Today, there are many different devices that help to curl hair, for example, curling iron, tongs, styler. However, the use of homemade products continues to be a popular method of creating curls.
So, the first to appear are curlers made from rags and paper. Incredibly, but plain fabric, plain paper and scissors make it possible to create very cute curls with ease.
Papilotki can be built even from one fabric. The material for them can also serve as foil, foam rubber and cocktail tubules.
We will tell about the most famous and effective methods of making homemade hair curlers. For convenience, we present the sequence of actions step by step.
Paper papilotki help make enough elastic curls of different sizes. What they will be (small or large) - depends on the thickness of the strands.
To make such curlers, take a thick waterproof paper (the newspaper is not suitable) and cut it into rectangular strips. Roll each one of them with a suitable diameter. Pass the tubes inside the narrow cloth (it is better to use the laces) and pull its ends out. They are needed to bind the ends of papillotok.
Wash your hair and apply styling mousse on wet hair. Then divide the entire head of hair into strands of equal thickness. Screw them on paper curlers, not forgetting to fasten well. Start the curl from the back of the head, gradually moving towards the forehead. For the night, it is desirable to tie a scarf on the head so that the papillots do not slip.
For the manufacture of this type of curlers you will need a foil (aluminum, for baking) and cotton wool.
 Cut 8 x 18 cm of rectangles out of foil. In the center of each of them, for the volume, put the cotton wool pre-twisted with a flagella and roll it up.
Note that to do the perm with the help of foil curlers is much faster than from rag. Time saves the absence of the need to tie them up. Fixation occurs through compression.
Center the strand of the foil tube. Leave about 5 cm of hair and begin to wrap. First wind this 5 cm around the tube. Then twist the device itself to the root zone. It is very easy to fix - you just need to squeeze the foil with your fingers.
Important point: curlers for large curls require a significant amount of wool.
First you need to pick up the fabric. Not any will do. Need 100% cotton or close to it in composition. The main thing is not to slip. After all, if you try to tie a knot of synthetic, it will quickly untie. As a result, you risk missing a few curls. For the same reasons, the use of tapes is also not recommended.
To make rag curlers, it is necessary to cut a piece of fabric into strips. Each cloth should be 25-35 cm long and 1-2 cm wide.
Place the tip of the strand in the center of the strip and try to wind the hair up to the roots. Firmly lock the strand - knot the ends of the strips. Since the curlers are soft, you can spend the whole night in them without any discomfort.
Bandage (hoop)
With a cloth headband or a regular wrap, a very beautiful curl can also be made.
First, divide the entire head of hair with even partings into separate strands. Now wind each of them on a bandage or on the bezel, then fix it securely. Those who are already familiar with the Greek styling will cope with the task faster.
To hairstyle looked neat, it is recommended to tie your head with a thin scarf. Want to get a more lasting effect? Then curl your hair just before bedtime, lightly wet it beforehand and dry it with a hair dryer after winding for a couple of minutes.
Foam rubber (loxes)
For the manufacture of loxes you will need the following materials:
If you are the owner of long hair, then the length of each foam strip should be about 18-20 cm. But its width will directly affect the diameter of future curls. From 2 to 4 cm - get small springs. From 5 to 7 cm - volumetric curls will come out. Cut all the strips in length, but not completely, but so that there is about 2-3 cm to the edge.
Begin to wind the hair on the loks not from the end of the strand, but, on the contrary, from the roots. To do this, put it into the prepared cut and evenly wrap the entire length of the foam strip with it. Fix the tips with a rubber band. After removing the loxes, you get beautiful vertical curls in the form of spirals.
Who would have thought that plastic tubes for drinking cocktails and juices can replace curlers! And quite successfully. To curl hair with them, you will need:
- cocktail tubules
- hairpin invisible.
 First of all, you need to sprinkle your hair with water. Then proceed to the separation of the strands and winding them on the prepared tubes. This should be done as follows. Place the tube under the strand near the roots and twist it in the direction of the tips. Hair should be slightly stretched. Each cocktail straw must be fixed invisible.
Withstanding such hair curlers need at least an hour. After that, from the hair you can remove all foreign objects. Carefully separate the fingers with large curls and slightly lift the hair near the roots. Do not forget to sprinkle with varnish.
Cocktail tubs are not the most amazing type of homemade hair curlers. This honorary “status” rightfully receives a sock. Common cotton sock with a high top (it is also called long). It is not recommended to use a synthetic product for curling. It strongly electrifies hair.
How to make a curler out of it? First cut the fingers off the sock. It should be a hollow tube. Then roll it in the shape of a donut. Washed and slightly damp hair gather in a ponytail and tie it with an elastic band. Take it by the end and pass it through the sock donut. Wrap a few inches of the end of the tail around the sock and roll it down to the very head. Make sure that the structure remains in place and is not loose.
After drying the sock can be removed. Gently straightening your hair, you get the effect of a beach wave.
Curls
Elegant spiral curls, as from the pages of a fashion magazine, and indiscriminate windy curlicues have always been, and, most likely, for a very long time will be a favorite addition to the image for many women.
Today everything is in trend, close to natural. Therefore, slightly carelessly curled locks look much more harmonious than perfect curls of the same size. But the spiral curls bring to the image a touch of romance and bewitching femininity.
Wavy spiral curl - a universal type of styling. It fits almost all face shapes. And the creation of such curls takes very little time.
Consider other forms of curling and find out which devices are best used for different lengths of hair.
Curls intensity
Than curling hair at home, we already know. The next level of difficulty is to learn how to create curls of different intensity. There are some of the most common options.
 Graceful curls. To get a well-defined spiral, it is necessary to process each strand with a styling foam before curling. Then take the curlers and, starting from the very tips, wind the strands up to the root zone. Make sure that each file is flush with the scalp. It is important. They can only be removed after the hair has completely dried.
- Hollywood styling. Large curls, flowing smooth waves, should be done with the help of large curlers. Their diameter should be at least 4 cm. Foil and foam rubber devices (loxes) will work well. Clean, wet hair should be wound with narrow curls. If you decide to use heated hair rollers, please note that they will need to be removed in an hour.
- Big waves. For such a perm are recommended loxes. Foam for them should be selected only high quality, to keep the shape, despite the strength of its compression. The length of the foam strips is the second important nuance. The longer the papilotka will be, the more curl you will manage to wind. Laying turns out beautiful when all strands have the same thickness.
 Graceful curls. To get a well-defined spiral, it is necessary to process each strand with a styling foam before curling. Then take the curlers and, starting from the very tips, wind the strands up to the root zone. Make sure that each file is flush with the scalp. It is important. They can only be removed after the hair has completely dried.
Hair length
As mentioned at the very beginning, the choice of the type of hair curlers depends primarily on the length of the hair. But this does not mean at all that you can use only one species at a time. For the sake of experiment, it is advisable to try all known, to determine for themselves a few optimal options.
For short hair is better to take the most thin hair curlers (paper, rag, foil or cocktail tubes). If nothing really works out, turn on the hair brushing. Apply a styling agent on clean, wet hair. Then dry the strands with a hair dryer, wrapping them around the comb.
Curlers of any type and curls of any intensity can be used for medium hair.
For long hair everything is the same as for medium ones. Add to the list of tools for perm possible except that weaving braids. Although it is not a homemade paper or sock device, it can successfully replace it.
Is it possible to curl curls without harm to the hair?
It is believed that the devices with which girls create curls, adversely affect the hair and spoil them. This is partly true, especially if you do it wrong and neglect the advice given by the professionals. It is not surprising that representatives of the beautiful half of humanity are asking themselves: “Is it possible to curl locks without harm to the hair?” Of course yes, if you choose the following option:
 Weave braids (hair does not come in contact with an unfamiliar environment for them, and fixation of the strands is done in the direction that is natural for them).
- Applying auxiliary tools from natural materials (wood - papillots, bobbins, cellulose and fabrics - papillots, fabrics - "bagels" and bandages).
- Working with soft synthetic products for a wave (foam rubber curlers-boomerangs and other options from this material).
- Using plastic or metal curlers (if you don’t plan to have a rest, it’s uncomfortable, some hairs will be torn or torn out due to excessive tension when changing the position of the head in a dream).
 Weave braids (hair does not come in contact with an unfamiliar environment for them, and fixation of the strands is done in the direction that is natural for them).
Which waving is better to refuse if you are afraid to spoil the hair?
- With the use of chemicals.
- On curling, thermal rollers, irons.
Biowave
Based on cysteamine, which is not as aggressive as acids and alkalis.
Benefits:
- Moderate impact on the hair structure (the main focus is on their upper shell).
- When performed by a professional, it lasts a long time (2-6 months - the length is influenced by the length, structure of the hair, adequate hygienic procedures, the degree of humidity of the atmosphere).
- Preserved color strands.
- Good texture curls.
 Disadvantages:
- High price.
- The advantages of the method are available only with a professional approach to the process (it is necessary to calculate the percentage content of the components, taking into account the state of the client's hair).
- Specific amber from the hair for several weeks.
- Not an option for hair dyed with henna, Basma (the consequences are unpredictable due to the lack of data on the results of the interactions of these vegetable dyes with the components of the means for curling).
- It is impossible to combine with gel styling products.
The composition of the effect means include fruit acids that have minimal damage to the structure and condition of the hair.
Benefits:
- Curls keep 1,5-2 months.
- Reduces the fat content of the strands.
- Suitable for all types of hair in good condition.
Disadvantages:
- Not suitable for lovers of sunbathing and swimming pools (it is advisable to protect the received curls from UV radiation and exposure to chlorine).
- Short-lived in "mermaids".
- Curls have increased rigidity.
When it is more reasonable to refuse the sparing methods?
 If the hair is “killed” due to frequent dyeing, other aggressive procedures to change the type of hair or because of health problems, even the most careful long-term perm is not worth doing. But do you need to get upset if safe ways of getting curls are always available?
Contraindications for gentle curls:
- Pregnancy.
- Diabetes.
- Problems with hormonal balance.
- Excessive hair due to UV exposure, salt exposure, frequent staining.
- Increased skin sensitivity.
- For previous staining, henna and basma were used.
How to effectively make curls at home without damaging the hair?
- Braids (small ones will give the effect of spiral chemistry, large ones will provide waves, they will add volume from the roots).
- Curl into bundles, which are then laid on the head with buns.
- On curlers, papilotki, "bagels", bandage.
Extend the vitality of the obtained curls:
- Slightly moisturizing before curling.
- As a modeling fluid, use strong fresh infusion of yarrow, nettle, tea or chamomile.
- Walk with braids or hair curlers for at least 8 hours.
On the toe (for the mane on the scapula)
It is better to take a double, long and of the same color as the hair (then small villi that are tangled in strands will not be noticeable).
 At the sock cut off the area for the fingers.
- Twist a bagel out of the pipe.
- Secure the hair in the tail with a sturdy rubber band.
- Moisturize in a suitable way.
- The ends of the raised tail to enter the "bagel".
- Secure the edges of the strands by twisting the ring towards you.
- Continue winding until you touch the start of the tail.
- To look with a fixed construction, the time needed for twisting the curls.
- Carefully remove the ring, form the hair and fix it with lacquer.
 At the sock cut off the area for the fingers.
On a sock (for a mane to a waist and below)
- Make a cross-section about 3 cm in the unfolded sock.
- Fasten the prepared mane to the tail.
- The ends of the tail enter into the cut.
- Wind up the hair on the toe to the place of its fastening in the tail.
- Tie the edges of the sock in a secure knot.
- Wait for the allotted time.
- Having untied the edges of the sock, dissolve the tail.
- Curls straighten, if desired, fix the varnish.
And the video will help you understand this topic better:
 Separate the strand.
- Insert its tip into the cut open lox.
- Slam the halves of the product and wind a curl on it.
- Secure the edge with a soft rubber band.
- After an optimal time, remove the lox.
- Curl straighten, handle fixing means.
 Separate the strand.
Do not be upset if the first time you do not get exactly such curls, as we would like. Locks are quite convenient and easy to use, just need a little experience. A few attempts - and you will succeed.
Beautiful hairstyles on soft curlers


Hairstyles on curlers made with your own hands will look perfect, if you choose them correctly for the type and length of your own hair, you should also carefully choose the style of styling that you are going to do. Today there are many models adapted to the most demanding women's requests.


For example, a hairstyle on soft curlers made of foam rubber with plastic fastening will look best on long hair of any thickness. They allow you to create soft waves, beautifully looking both in uncool and in styling. For curling you additionally need a regular comb and hair styling that is suitable for the hair type - mousse or foam. When washing your hair it is worth using a balm or conditioner, the more flexible and more obedient the curls - the more beautiful the styling. On a towel-dried, slightly damp hair, apply styling, paying particular attention to the roots to provide additional volume and ends of the strands.


Divide your hair with a comb into zones, no matter what style of styling you have in mind, you should start with strands over your forehead. Comb the hair, separate the narrow strand and, pressing its end with your fingers to the curlers, twist it and secure. Twisting the strands is "from the face", trying to do it as smoothly as possible, just need to put all the hair and let them dry at room temperature.
In no case you should not dissolve the wet curls or dry them with a hairdryer - so you risk not to save the styling.
Hairstyles on big curlers, papilotki and "flypapers"


Hairstyle for large curlers allows you to create a beautiful amount of smooth lines of styling and natural-looking curls, the larger their diameter, the larger the curls will be. After waiting for complete drying, you can comb the strands, using a hairbrush - so you get a classic styling, or you can just make out the resulting curls with your hands to create a more avant-garde hairstyle. Give the styling additional volume, slightly beating the curls with your hands, and fix it with a small amount of lacquer medium fixation.


By the same principle, hairstyles are created on hair-rollers, they can also be used to create classic styling, and you can experiment by styling your hair not only in horizontal curls, but also in vertical ones. Papillots are just as safe for hair as regular models, they are foam cylinders with a wire frame inside. Place the papillo perpendicular to the selected strand as close as possible to its end, wind it up and wind it up to the roots, giving the file the shape of a boomerang, and then fix it. To do this, simply bring its ends together.
Pinned papillo can be twisted between each other, giving styling a more complex pattern. Papillots are great for styling hair of medium length and very short haircuts, the size of curls depends only on their thickness. The larger their diameter, the softer and more volume curls will turn out. But when creating such styling, you also should not use a hair dryer, and dry your hair at room temperature.


Also on hair of any length, you can create a hairstyle on hair curlers - "Velcro", they are ideal for not too thick hair. "Velcro" got its name due to the special bristles that cover their surface and allow you to attach strands without additional effort. With the help of "velcro" you can both add extra volume to your hair or create small curls. The result depends only on their diameter. The only thing that should be taken into account when choosing such a method of laying is to remove Velcro from dried strands very carefully - their hair may be confused with their surface. To avoid this, carefully lift the strands from the roots, before you dissolve the finished curls
“Papillots” and “Velcro” are indispensable for creating hairstyles for hair curlers for medium and short hair, regardless of their thickness and texture, but for owners of long curls it is best to use the classic models of foam rubber.
Hairstyles for large curlers for medium-length hair (with photo)


One of the most stylish hairstyles for hair of medium length for large curlers, regardless of the fact that you chose "papilotki" or "Velcro" is created in the combined technique. To do this, you in random order need to lay strands of the parietal and temporal zones, leaving the entire volume of hair on the nape free.


The curls are laid in the same way - from the forehead to the back of the head - as a result you will get a beautiful face framing with side strands. The resulting curls can be carefully combed, creating a voluminous and soft styling silhouette. And you can just straighten your fingers, combining curled and loose strands. In any case, you will get a natural spectacular styling, demanded in both everyday and evening images.
How to professionally do your own hair on hair curlers on medium hair will prompt these photos:


How to put on a curler short hair, "ladder" (with photo)
Haircuts are always popular and their care and styling take a minimum of time. To make hairstyles for hair curlers for short hair, it is worth using thin “papilotkami” or “stickies” with additional clips, which are called “crabs”. Fully secure the strand of short length without them is almost impossible. Hair for a perm should be prepared according to the classical scheme: wash and moisturize, allow to dry slightly at room temperature and apply additional styling on the entire length of the strands.


Haircuts with long side strands, such as a variety of styles "bob" or "square" can be laid by curling the top of the head area from the forehead to the back of the head, and putting the strands inside. Dried strands can be combed to form smooth, neat waves, or you can simply straighten your fingers and fix with a small amount of varnish. In any case, the installation will allow you to create a beautiful additional volume.


But some short haircuts require their approach to perm. For example, how to put on a curler short haircut “ladder”, you will be prompted by her drawing, and thin “papilotki” will allow you to give it a spectacular look. Start with the shortest, crown strands, gradually moving to the temporal, and then the occipital, curling their ends not inside, but outward, in order to shade the stylish pattern of the haircut.
The same technique will allow you to effectively lay a short haircut with a long asymmetric fringe. Laying it is also worth it, starting from the top of the head, separating the thin strands and gradually moving directly to the bangs. Straighten the dried strands with your hands, taking the whole array of hair from the forehead to the back of the head;
Gently fix the effect with a small amount of hairspray; for short hair, it is worth using extremely careful styling when curling.
To preserve the naturalness of the finished styling, for short haircuts of almost all styles, a “ball” of mousse or foam is the size of a walnut and quite a bit of gel or wax is enough.
Please note how creatively styled hair curlers for short hair on these photos:


Hairstyles for hair curlers for long, thick hair
When deciding what hairstyle to do with curlers, be sure to consider not only their length and thickness, but also the structure of the hair. Long and soft curls perfectly amenable to curling on foam "papilotki" - boomerangs and soft voluminous Velcro. But in order to create a hairstyle for hair curlers for long and thick hair, and even more tough by nature, you should definitely use the combined technique of curling.


To do this, you need the volume soft "papilotki", and to beautifully draw the main array of curls - heated hair rollers. Before use, they must be heated up by dipping for a few minutes in boiling water or using a microwave. It is worth remembering that in no case should this method of laying be used daily, only wind the ends of the strands up to the middle of their length and do not stack them at the roots. Such a “hot” styling can damage the hair structure as well as curling iron or forceps. In any case, a special thermal spray should be applied to the hair.


To create a beautiful styling, hair on the crown and temporal areas, you need to curl with the help of large-sized “papillotok”. And dry the rest of the array of hair, carefully combing and dividing it into thin strands, put it with the help of thermal rollers. Curls can be made in the classical style, curling the ends of the strands inward and forming soft, smooth waves and curls. And you can twist it out, and create a complex and beautiful contour. To do this, you need to completely dry your hair, apply a little styling on the ends of the strands and slightly pull it out using a round brush. Bend your head down, slightly beat the styling with your hands, disassembling it into separate strands.


Thin and not docile hair should be slightly treated with varnish at the very roots, also with the help of hands to add extra volume to the strands on the crown. Easy negligence, ease and naturalness are the obligatory features of today's fashionable styling, so you shouldn’t abuse styling.


Such styling looks great on multi-level, cascading haircuts for hair of the most different lengths. You can also put your hair with a haircut of any style, the contour of which is decorated with thinning or torn “feathers”.
Such waving look not only spectacular, but also fashionable, this is one of the most trendy styling in the spirit of the 70-80s of the last century.
The same stylish and beautiful hairstyles on curlers as in the photo, you can easily do with your own hands:
Useful recommendations
Curling the hair on hand-made papilotki - a long process, but safe. The result is a light, elegant styling without any damage to the health of the curls.
What else is advisable to know if you plan to do the curl at home:
 Want to make your image airy and light? Use large curlers.
- Hair, framing the face, you need to curl very carefully. These curls set the tone for a whole hairstyle.
- The first step is to remove the curlers from the lower curls, which are closer to the back of the head and ears. So you can avoid unpleasant confusion.
- If curls keep very little time, use cosmetic wax. Hair does not stick together, but curls retain their shape during the day.
- Never brush your hair after removing the curlers. They will lose their shape and fluff. Instead of the expected romantic image, you will get a resemblance to a stubble poodle. Carefully correct the curls with your fingers, dividing each of them into a number of small curls.
 Want to make your image airy and light? Use large curlers.
Make from scrap materials full-fledged curlers, and with their help - every woman can make a spectacular styling.
Elastic spirals or careless waves created by your own hands will undoubtedly improve the appearance and bring a bouquet of positive emotions. And also such “needlework” saves time and money. After all, now, in order to turn into Curly Sue or to be like Jennifer Lopez, you do not have to run to the salon and pay for styling, which, moreover, is unlikely to be so benign.
Curling iron
 Use only with normal or greasy hair.
- Expose medium mode.
- Make strands thinner to reduce the period of one-time exposure.
- Hold for 5 to 25 seconds (depending on the compliance of the hair).
 Use only with normal or greasy hair.
In order for the effect to be preserved for a long time, experts recommend using fixing agents. For example, hairspray, with flexible fixation, is designed specifically for curls.
Is it possible to do such hairstyles often?
Determine yourself, given the current state of the hair: faded, brittle - it's time to take a break and do restorative procedures.
The beauty of curls depends largely on the accuracy in the process of their creation. Take your time deciding to get an avalanche of kucheryashek by tomorrow. Work only with refreshed hair, with thin strands, twist them evenly and do not rush in the process of removal of utility tools. Then the result will be happy, and the condition of the hair will not deteriorate.