Author: Gorina Svetlana Valentinovna, teacher of additional education,
Municipal state educational institution DOD Surovikinsky house of pioneers and schoolchildren, Surovikino, Volgograd region.
It's nice when a young fashionistas beautifully tied hair. And how nice it is for girls to get a gift made with their own hands just for her.
Master class is designed for teachers, for parents, for older children.
Purpose: making a gift for the holiday of March 8 for girls, hair ornament.
Purpose: development of creative imagination, attention, accuracy, perseverance, education interest in creativity.
Tasks:
- make a hair tie,
- master the ability to work with different materials.
We offer several options for making hair ties.
How to make rezinochki of satin ribbons
Craftswomen are able to do rezinochki their own hands from ribbons in several techniques, which, when carefully considered, become quite simple. The main thing in this business is to learn basic skills, follow the schemes and master classes and apply your imagination to make a beautiful decoration, distinguished by individuality and spectacular appearance.
The basis of the manufacture of rubber bands is the technique of weaving, folding and gathering elements into one large pattern. For beginners it is better to take the basic skills as a basis, learn them, and then begin to complicate them. Even simple rezinochki can look spectacular on the girl's hair, if they skillfully decorate. Embroidery, weaving, beads, beads, sequins are the decoration options for finished products. You can try a variety of decoration options to make beautiful decorations.
Materials for making rezinochek are satin ribbons of different colors and shades, beads, beads, decor elements. From auxiliary tools you will need glue for textiles, scissors, glue gun, a source of fire (a candle lighter) and skillful hands. Sometimes craftswomen take ready rezinochku, bought in a regular store, and decorate it in their own way. In this case, you will need a base where the elements will be fixed - cardboard, metal hairpins, plastic crabs.

Kanzashi bands of rubber bands
Japanese kanzashi art is considered a well-known technique of creating gum from satin ribbons. To make a beautiful children's accessory for hair resembling dahlia or chamomile, girls need to follow a master class:
- Make 16 square patches of 5 * 5 cm in size from a satin or silk cut, hold a lighter along the edges so that the threads do not come out. Repeat for a different color (inner petals).
- For the outer row of petals, each square should be bent diagonally, repeat, cast a corner with fire. For the inner row of petals squares are bent diagonally three times.
- Fold the smaller billet inside large, glue.
- Make 12 single-layer blanks for additional decoration.
- From thick cardboard cut 2 circles with a diameter of 3.5 cm and 2.5 cm, glue over the fabric.
- Each double-layer petal is glued to a large base in a circle. Repeat for the second tier. To a smaller base stick single-layer petals. Glue 2 bases together.
- Decorate with beads, glue the resulting flower on a hairpin or crab.

Air huge white nylon bow: a step-by-step instruction on homemade
Make it quite easy. You will need a nylon tape with a length of 3 meters and a width of 7 cm. a circle of cardboard for the base of the flower. A square satin ribbon to wrap a piece of cardboard, a rubber band 2 turns, a needle, white threads, a little glue for a moment, a lighter.

All shaggy surfaces of tails during assembly should be immediately burned over a candle, a lighter
The bow is made literally in 20 minutes. If there is a pearl, decorate the flower basket in the center.

Big Red Poppies of Satin Ribbon
Master class: Kazanshi Maki hair ties with round petals.

For a flower, cut out of 5 red circles with a diameter of 10 cm and 8 cm. And also 10 black squares with a diameter of 5 cm.
Attach to the circle with a rubber band (as in the previous version) on the glue first a large part of the petals, then a small, then black middle. We have a luxurious volume poppy, but it looks elegant and single.

White dahlia with beads: beautiful elastic fabric
By the same principle, you can make a large white flower from organza and chiffon. Only petals will need more.
Then you need to attach the structure in layers to a tight mug of cloth or a covered cardboard box with an elastic band. It turned out white dahlia. It is time to sew beads.
You can constantly make a variety of large luxury gum in the style of Kazan, like a white dahlia, but also small, children's hair bands look very beautiful with their own hands. Especially if it is white daisies with ladybirds on a yellow basket - the middle, or delicate azure bells.

Simple bells: a master class with the scheme
These cute hair ties made of satin ribbons are made using the same technology Kazanshi, but with sharp petals.
Attach the stamens of beads on strings, and elastic to a piece of thick fabric.

Velvet wavy elastic for hair: how to make your own hands
Need a gum linen 10 cm, a strip of velvet with a width of 10 cm, length 0.5 m.
Zashit hole secret stitching. The result was a beautiful wavy surface.
You can wear immediately or first decorate with rhinestones, beads.

Hair clips, do-it-yourself hair clips - it's not at all difficult. Bright beautiful ribbons in a huge assortment of shops for sewing. Many women who do not work for one reason or another, have created quite a profitable business through the manufacture of hand-made accessories. For us, the rest of the beautiful ladies, making charming elastics for hair is an excellent money saving on knick-knacks and a good time to surprise our acquaintances with a unique, unique in the world luxurious bow, hairpin, and an elegant flower on an elastic.
Beautiful bows of ribbon do-it-yourself: master classes
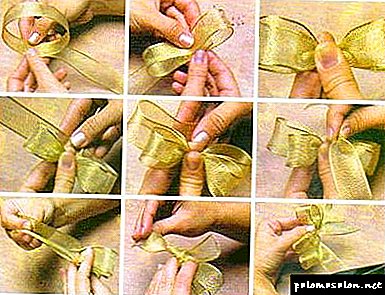
In fact, learning to tie even the most complex bows is not very difficult. This will help the instructions with a lot of photos, which today I have prepared for you in abundance. There will be both selections from the Internet and unique workshops specially prepared for you.

How to make a bow of satin ribbon: step by step instructions
Satin ribbons - the most popular material for creating small masterpieces. Smooth, shiny, relatively inexpensive ribbons have always attracted the attention of needlewomen from around the world. The material has been used in various fields of creativity, with the exception of steel and jewelry based on various bows.
To create accessories, you can use ribbons of different widths, but it all depends on the design and technology you have chosen. Let's start with the simplest species.
Double tape
Double bow is performed in a slightly different way. It is useful for him two rings of tape and separately created center, resulting in sealing the edges.
Fold the two rings in the middle and sew or glue together so that they touch the side parts. After this, the middle is closed by a pre-made part. The design can be attached to a hairpin or elastic band.
For this accessory it is necessary to take a medium or wide ribbon; it will not come out of a thin, narrow material of such beauty. If your choice goes to a width of 2.5-5 cm, then this will be the perfect solution.

Such an analogue can be a variation of such a bow of two ribbons: in this case, the two rings overlap with each other. You can also experiment with the color scheme - for example, create a red or green bow or even combine one or several shades in one product.
Try to make more than two layers, take tapes of different widths and textures. Thus, from one scheme of creating a bow, you can create a lot of a wide variety of accessories.

Layered lush bow
A great option for schoolgirls and not only. This bow is easy to put on a hairpin or comb to attach to the hair. It is based on two simple bows, discussed earlier.
To fold this, you need to make the basis of two overlapping layers. From the tapes folded in this way, the back part will turn out. The front is like the easiest first bow. At the end they must be connected with glue or thread. All together is fastened with a central piece.

This way you can get more spacious accessories, like the white bow shown below. Here there is one difference - the basis is not two layers, but three.
Romantic and elegant, this addition to the image will delight any graduate who wants to give nostalgia. But this option, unlike the jewelry for girls, is more adult and feminine, and this is exactly what is needed in such cases.

3-4 ribbon bow
Very beautiful bow, which is well suited for decoration on the head. To do this, three or four (or even more) pieces of ribbon of the same width, but of different length, need to be stitched with an infinity sign and nested in one another. Make a midpoint like a few microns earlier.

Many beautiful bows are made in the kanzashi technique. This kind of creativity came, as you might guess, from faraway Japan. There, in this way, they create magnificent details to complement not only casual but also festive attire.
Bow flower
Making such a flower is a simple matter, but painstaking. You will need at least 12 petals, which will need to be pre-cut from a ribbon 2 and 4 cm wide (you can take a different width, but not less than 1.5 cm).
First make the first layer, strung with six wide petals and pulling them. Place some decoration between the layers and attach the second layer made in the same way. Don't forget about the bead in the middle.

Another variation of simple but beautiful petals is located below. Here, the flowers come out more spiky.

A more elegant white flower is created below. In the staged photos you can see that the petals for the flower are made by twisting the ends inside the middle. Such a bow can consist of a pair, or of five or six layers of layers gradually increasing in number of elements.

Bow on discharge from the hospital
Newborns (and indeed children) deserve the best! That is why I found for you a beautiful bow that will suit both girls and boys. For him, you need a fairly long tape (at least three meters).
In the middle make a winding of several layers and then a bundle as in the photo. After that, you will need to pull out a few petals formed by previously folded rings.
Why leave such long ends around the edges? The fact is that you will need to tie them around the long-awaited convolution, leaving the beautiful center in front. At one time, I generally acquired a five-meter ribbon — the nurse imposed such beauty from her that we still remember with a smile with the whole family.

Baby bows
It looks very interesting combination of several types of ribbons. In this case, the colors are also combined, which, nevertheless, look very organic. The polka dot ribbon is superb! This bow will decorate the girl's head for a holiday and in everyday life. For it you will need to connect the two tucked parts, as it was before in the master classes. The top will be decorated with a classic variation.

On an elastic band
To collect a magnificent bow on the gum is not difficult. To do this, you need several layers of bows, designed as we did earlier. The number of layers is limited only by your imagination and common sense. The distinction of this accessory is that under it there is a semblance of crosses with serifs at the ends.
You can connect all this splendor with ribbons 1 cm wide, tied the middle. You can attach a bow to an elastic band using a glue gun or something like that.

A bright school-inspired bow explodes early ideas of what a school accessory should be. It's just a bomb!

Bow tie
With the help of rep ribbons, you can even make something like a tie! Yes, the butterfly will turn out small, but very spectacular. To create it, fold the ribbon, folding the edges under each other, as in the photo below. It takes three such layers. Below them, attach a longer ribbon so that you can tie it at the back. In a micron, it is quite short; in this form, it can be left for a simple accessory.

And here's another funny variation of a bow tie. It uses no more or less bird feathers, connected by a ribbon in the middle. An interesting interpretation of the standard butterfly, isn't it?

By the way, bow bow can be made from fabric, master class is about it below.


Big bow
A very big accessory for a very big gift. Such a bowtie can be made from a ribbon, but it is better to use wrapping paper, which will take a lot of such a piece.
Attach a small box to the base of the decorative element. It may be a surprise or it may just be the basis for such an accessory. Place it in the center of the square, which at the top and bottom close it with edges. Fold the free edges as in the photo below (as if you are wrapping the envelope). Press in the middle and wrap in a small piece of paper of sufficient length. Straighten the edges so that they become as lush as possible.
Such a bow can be used as an independent packaging or as a decorative part for a huge surprise.


Beautiful for a gift
The next lush bow has an incredible Christmas mood. It literally blows from him! For it, you will need to fold the ribbon as shown below, overlaying and linking several layers with each other.
On top of the design, put a few bows, folded as shown below. Decorate the center with a beautiful bear in a cap or any other decorative element.

Paper bows: simple, cheap, original. All master classes describe their creation in great detail.


Do you want more bows for a gift? Read about it in another article.
Nylon bows
Capron tape is traditionally used for graduates and hair ornaments. But also for other purposes similar bows can be applied.
A simple bow on the plug is created in just a couple of minutes. To do this, you take a fork, thread a thin ribbon in the middle, thicker on top of it. Thicker tape wrapped around the teeth of a fork many times, forming a braid. Ribbon thinner becomes the central part of such a flower.

A semicircular metal pattern will help “cut” the petals with a small similarity of a soldering iron. To do this, two tapes - kapron and satin - must be folded as shown below. After this, the middle one bends inwards and it will take a lot of such petals. They merge into a single layer, then into another, etc., until you get a magnificent multi-layered bow, which can be used to decorate hair.

In the next accessory, nylon tape is used only as an additional accessory, decorating with itself a base made of fabric. You can create such beauty in a few minutes, and decorated with a nylon ribbon, it will look even richer.

The next bow is classified as a gift, but I decided to place it in this section, because it is made of nylon ribbon. For it, you will need to fold the ribbon in many layers, and in the middle make an incision, which will need to be tied up with a thin fishing line, around which to tie the ends.The most important stage comes: you need to pull out all the tips of the folded tape in order to get a very lush design.
This bow will decorate the Christmas tree or just become a decoration of the apartment.

Such an accessory can be made from a thicker ribbon and even from burlap. Pulling the ends will be more difficult, but the effect will be more unexpected and extraordinary.

Photos of other beautiful bows
As they just do not make out! In the form of elegant brooches, bracelets and much more. For example, the accessory below will be an interesting addition for a festive attire.


Another lace bow with a bead inside.

In general, thanks to lace, even the simplest design begins to look more original and festive.


Just see how you can decorate your pen by adding several layers of lace and satin ribbons to it.

The bow on the rim will make a pupa out of an ordinary girl, hurrying to the ball.


Roses as bows. Great, isn't it?

The bow on the dress looks very impressive and original.


MK in video format
Several master classes in video format will be a great help in creating bows of various kinds. Ideas will be especially good for schoolgirls and graduates on the last call, graduation and September 1.
That's all, dear friends. Tell me how you master classes and photo ideas bows and check back often on our resource. See you again!
Sincerely, Anastasia Skoreeva
You might also be interested in:
The site nyaskory.ru collects user metadata (cookies, data about the IP address and location) for the normal functioning of the site, the ability to display ads that interest the user, and publish relevant material.
If you do not want this data to be processed, then you must leave the site.
4 comments left for the article
May 8, 2018 | 21:25
Nastya, I got real pleasure from watching the ribbons! I love them! And, by the way, I took note of the use of forks to create them. thank
May 8, 2018 | 22:32
Thanks for the feedback)
August 22, 2018 | 06:46
great . soon September 1st. for the first time in first grade. I will definitely make my own. thank
August 22, 2018 | 11:53
Thanks for the tip, Svetlana! Be the most beautiful on this day)
Bows for every taste

Bright options for hair jewelry for little fashionistas
It is in such cases that we remember that everything can be done at home, especially since the bows of ribbons on the hair with their own hands are not so difficult as it seems at first glance (read also the article “Hairpin Crab: one for all occasions ").
Of course, this is not a matter of minutes, here you will need patience and perseverance, however, your time and your work, believe me, will be rewarded - admiring glances and compliments will be provided to you.
On how to make bows of ribbons for hair, we describe below.
Create different bows

Elegant look for kids and adults
Before you begin to work, determine what shape and size you would like to create the product. Do not be afraid to show imagination and experiment with the size, material and colors, combine different quality and colors - so the accessory will come out especially original and unusual.
Note! Before starting work, pay due attention to the choice of tape material. Try to take the one that is dense enough - then the bow will keep the given shape. Suitable materials such as satin, silk, satin, linen, cotton, velvet, etc.

The choice of color, width, shape is always yours
Bows for hair from ribbons with their own hands are made in different ways and there are different types, below are the most common options:
- Satin product. To make a simple bow for hair with a ribbon with your own hands, you will need a ribbon of about 20 cm, it will need to be folded in half. You will get a loop that you need to lower down. So you will have two small loops that need to be crossed among themselves, twisting one into a circle and slowly stretching.
Option to create a bow
- Flower-shaped bow. To create an original and beautiful accessory, it is better to choose a ribbon of medium width. You need to twist the tape so that the first coil formed is crossed tip.
Such actions should be carried out until you are satisfied with the flower pomp - adjust it to your taste. Fastening is carried out by the last round and binding by a knot in the center.
- The product with the decor. To create the next accessory, get a wide dense ribbon, the edges of which you need to sew together to make a circle. Sew two such ringlets.
Fold the rings on top of each other and press down so that the joint is formed on the seams. Cut a small piece of ribbon and tie a ring to it.
The size of the bow allows you to decorate it with additional decor - so you can glue sequins, rhinestones, and beads onto it. The center can be decorated with a bead, a button or a large stone.

Fork - a handy tool for creating a small bow
- Little bow. Not sure how to make a bow of a miniature hairband? Then a fork will help you.
Take a thin ribbon, wrap the plug with it, so that one edge of 5 cm remains free. Wrap the long tip around the plug and pull it out from the bottom of the short edge. Next, it is necessary to hold in the middle of the teeth of the fork on top of the tape and pull down.
Lift the end of the ribbon and thread it into the loop. Now tie the knot. Adjust the length of the tails.
A bow can be glued on stealth or hairpin, it will look in combination with any hair just charming.
Tip! So that the bow is not dissolved, and the threads do not interfere, gently hold its edges over the fire, it is most convenient to do this over the candle, but be careful not to get the tape smeared with wax. Act quickly so as not to burn the material, while the edges remain smooth.

There are many ways of performing, add your imagination here, and as a result there will be a unique hairpin
We sew an American bow
How to make bows for hair of ribbons with multi-layer loops? Such a question arises in many girls who are already fed up with standard bows. Multi-layer bow is called American, and to create it you need to prepare all the materials.
You will need rep ribbons - for the base, take three ribbons, the width of which will be different. The background will be decorated with ribbons of 3-4 types, the width of which can be 1-2.5 cm.
In general, choose the size and design to your liking, but to make it all look harmonious. Also prepare cardboard, scissors, glue, cigarette lighter, needle and thread.
Make such a product does not make much difficulty, and step-by-step instructions with photos, you will help create the perfect American bow:

To create curls, take a cardboard size of 15 × 7.5 cm.

Using a pair of scissors in the center, cut a line about half a millimeter wide and about 4 cm long.

Prepare three cardboard templates, but the length of the cut line on each should be reduced by 2.5 cm, the width remains unchanged.

Take a 2.5 cm ribbon and attach it to the edge of the cardboard near the cutout with a clip.

Wrap the cardboard with a tape, and in the middle of the cut line pierce it with a needle. Next, remove the tape, while not touching the needle.

Hold the tape so that its tail was on top, carefully separate the coils to the sides, but so that the center remains fixed with a pin.

Lock the center with a needle and thread, making a few stitches.

Do the same with other ribbons and patterns.

A pair of ribbons of the same color and size cross, and pierce the center with a needle.

Do the same with the subsequent segments, but lay down one on top of the other. Create a beautiful X-shape. When everything is done, in your opinion, ideally, fix the middle with several stitches and wrap it several times with thread.

Connect all the resulting parts together. You can do this by tying them together with a thread several times.

On the reverse side, fix the clip on the hair, for this you can choose a rubber band, stealth, crocodile, or the usual clip.
Summing up, we want to note that bows for hair do it yourself with ribbons - this is not only saving money, but also a manifestation of your individuality, because only you will have such decoration. We wish you creative flights and fantasies (see also the article “Kanzashi hair ties and other decorations”).
Well, the video in this article visually depicts the whole process of creating an unusual decoration.
Stages of work:
- Take a satin ribbon 5 cm wide and cut it into 6 pieces (each should be 14 cm long).
- The obtained segments should be folded in half and assembled on a double thread, making a strong knot at its end.

- We have turned the petals, which must be combined into a flower and fastened with a thread.

- Now these same actions need to be done with a satin ribbon 2.5 cm wide. Thus, we have two flowers: large and small.
- To the large flower on the back side, you need to glue the felt circle so that our bow is stronger. You can do this with a glue gun.

- Cut the silver ribbon into six 15 cm long pieces, fold the ears into them and glue the ends together, as shown in the photo.

- Now we cut the silver ribbon into six pieces of 8 cm length and also make ears from them.
- All the preparatory work is completed, it is time to collect our bow. To do this, you need to glue the ears 15 cm long with a glue gun to a large bow.

- From above we glue a small bow.

- On the small bow you need to glue the remaining ears. To make our bow look spectacular, in the middle of the resulting flower you need to attach any small decoration, for example, a heart.

- The last thing left for us to do is glue a hairpin. And our satin ribbon bow is ready!


Hair bands made of ribbons of different widths
Spectacular and voluminous obtained gum from satin ribbons with their own hands, made of a material of different widths. There is a master class for making an accessory:
- Cut a rectangular blank of cardboard 9 * 16 cm, draw a horizontal line in the middle. To wind a ribbon on it.
- Remove the coil without damaging the coils, sew the middle, pull off to the formation of a bow.
- Repeat the technology for the manufacture of a bow of a different material and a narrower tape.
- From a fabric of a contrasting color, cut pieces of the same length and width as the resulting bow, sing the edges.
- Collect all the items on the thread.
- Cut a cardboard circle, covered with a cloth, sew to rubber band.
- To glue a bow on a circle with a glue gun, decorate with small beads, rhinestones, buttons or pebbles.

Bow from the tape do-it-yourself: master class


There are a lot of options for making bows from rep ribbons. So, if you want your product to be more lush and colorful, connect the bows of satin and rep ribbon. In this case, you need to take a satin bow as a basis, and attach a rep in the top. Also, such a bow can be decorated with a braid and make him the middle. Especially since we already know how.
We have learned how to make bows from different ribbons with our own hands; now we can safely fantasize and try to create our own masterpieces. By the way, such bows are used as decoration not only for hair, but also for gift wrapping. Creative success to you!
Gum on a bunch of satin ribbons
For the manufacture of gum from satin ribbons with their own hands, decorating the bun-bundle, girls will need to follow the step by step instructions
- 6 pieces of green ribbon 4 * 2.5 cm incise the dome, singed from 2 sides to create a wave - it will be leaves. Bend the bottom edge in two places, glue in the center to obtain a concave flat part.
- 12 pieces of white tape 4 * 2.5 cm and 5 pieces of 3.5 * 2.5 cm cut in a semicircle, scorch, glue into a droplet.
- Glue 5 blanks together by overlapping each other, decorate with stamens.
- Repeat for 14 pink petals of pieces 4.5 * 2.5 cm.
- Round the first layer of white parts, glue the remaining petals, make the second layer around the circle of pink elements. Glue the leaves.
- Make 5 such blanks.
- 4 pink pieces 10 * 5 bend in half, glue the ends with a fold, connect with a bow. Repeat for 2 white blanks 9 * 5 cm.
- 2 white ribbons 8.5 * 5 cm and pink 9 * 5 cm fasten with an overlay of white on a pink layer, form a fold, decorate the bottom with beads. Glue the bow, disguised middle.
- Behind the Bantu and flowers, glue the felt circles with a diameter of 3.5 and 2.5 cm, sew all the elements on the stitched lace elastic. Decorate the bun.

Ribbon bands with bows
Effectively on the hair look in the form of bows, which can be made by following the instructions:
- Take 2 ribbons 2.5 and 0.8 cm wide, 1 meter long, 1 ribbon 8 mm wide and 50 cm long.
- Make 2 cardboard templates in the form of a letter P of 6 and 8 cm in size, cut off the edge of a wide ribbon along the slant, lay in a large pattern so that the cut and 2 folds are from each edge.
- Fasten the ribbon in the center with pins, sew a “forward needle” with a seam, assemble, fix.
- Repeat for the second bow, sew together, attach the bead in the middle.

Video: do-it-yourself satin ribbon
Beginners skilled workers can try to make gum from satin ribbons, repeating the master classes. For convenience, there are instructions with photos and descriptions, as well as video materials, which clearly demonstrate the tricks of making jewelry. Following the instructions, you will receive interesting hair accessories that you can wear yourself in any hairstyle (braids, buns, tails) or use as a gift.