In order to learn to master the curling tongs perfectly, long systematic training is necessary. The master must be able to properly hold the forceps in his hand, and also quickly and naturally turn them in the palm of the hand both clockwise and counterclockwise with simultaneous squeezing and unclenching of the working parts.
It is necessary to hold the forceps with your right hand, and the forceps handle rests on the palm of your hand, between the thumb and index finger. The working part of the forceps should be located on the side of the thumb and index fingers.
If it is necessary to turn the forceps clockwise, they are placed in the initial position in the right hand and begin to turn with the whole brush of the right hand.
So, it is necessary to master the techniques of owning the forceps so that you can easily, effortlessly, turn the forceps in any direction, leaving the working part closed, and also at the same time with the turns open and close them.
2.1 Laying curls
Despite the huge variety of existing hairstyles, their main elements are waves and curls. Changes in their appearance or relative positioning lead to changes in hairstyle.
Hairstyle done only from the waves or only from the curls - in any case, it can be original and peculiar. But the most popular hairstyles, combining waves and curls. The alternation of these elements, as well as their modification in certain areas of the scalp and give each hairstyle originality and uniqueness.
2.2 Types of curls
According to their shape, the curls are divided into several types: straight, or simple, oblique, vent, vertical, crumpled and parallel in several rows.
Straight curls are considered curls horizontally. If they are arranged in several horizontal rows, they are already called parallel.
Slanting curls. On the scalp usually located at an angle of about 45 ° to the vertical or horizontal.
Wrinkled curls when styling hairstyles are laid in such a way that their base looks like a wave, passing further to the ends of the hair strand into a curl.
Curls, the ends of which descend from their middle in the form of a spiral, are called descent curls. To perform such curls, long hair is necessary - at least 20-25 cm.
2.3 Methods for styling hair in curls
The method of curling curls "down" allows you to perform a variety of hairstyles, although they all look a bit heavy and monotonous. When curling the way "down" is recommended to perform curls smaller and lighter, because with large curls hairstyle will look coarse.
Curl curls way "up", on the contrary, gives the hair lightness and lightness.
But due to the fact that curled up curls when combing give a big wave, it is not always convenient to use one this way.
Curling of curls with the “eight” method allows you to perform hairstyles only from fairly long hair. This method of curling hair provides the greatest strength.
The most ideal conditions for curling hair are those under which the hair is twisted on the tool, be it forceps, hair curlers or bobbins, perpendicular to the axis of its rotation. The curl at the same time turns out elastic.
For curling into curls, the thickness of the base of the hair strand should not exceed 4 cm. This condition must be met in order for the hair to warm evenly. At the same time, the hair strand should not be too thin. When curling hair into curls, one has to take into account not only the thickness, but also the length of the strand. The longer the hair strands, the thicker their layer when twisting on the forceps.In this regard, it is necessary to be able to adjust the length and thickness of the strand depending on the length of the hair. The longer the hair that needs to be curled into curls, the thinner the strand of hair should be taken for twisting.
Before you begin curling hair with forceps, you should prepare the necessary tools and accessories. To perform it, you need: forceps of the desired diameter, a metal or horn comb, that is, one that does not melt due to the action of high temperature.
For curling the hair into curls will also require thin studs or clips to secure each curl after curling. Before curling, apply hair styling mousse over the entire length of the hair.
Have you ever wanted to make a new, amazing hairstyle for a special occasion? It is very easy! Prepare heated electric hair curling irons - and a cascade of flowing curls is provided (Figure 2).

Before curling, apply mousse for styling along the entire length of the hair - and you can proceed!
1. Heat the tongs first. Then divide the hair into pieces, starting at the back of the head. Take a strand of hair 4-5 cm wide and wind it with forceps.
2. Carefully release the spiral wound strand and secure it in the middle of the "invisible." Continue likewise, until you twist the last strand.
3. Free the hair from the back of the head. To make the hair more volume and naturalness, separate the curls with your fingers along the entire length.
4. Grab your fingers along the large strands of hair on both sides of the head and do not twist them tight to the tips.
5. Now connect both strands and fasten them with “invisible” on the back of the head.
6. Lay the rest of your hair in such a way that it falls on your back.
7. Fingers, take a little wax and, pulling a few curls, run your hands along their entire length.
3.5. Hair Styling
Hair styling is called curling them for a short time.
Hair styling consists of various operations with which hairstyles of any shape and pattern are performed.
There are several ways to style your hair:
- cold styling (styling with a comb and fingers, styling with a curler),
- air laying (laying by means of a brush and the hair dryer),
- hot styling (forceps styling),
- combined laying (laying in various ways).
The duration of the preservation of styling will depend on many factors, such as: the structure of the hair, their elasticity and elasticity, the selected tools and their diameter, composition for styling, weather conditions.
Consider first the basic elements of hair. Parting - the most common element of hair, is a straight line dividing the scalp into two equal or unequal parts. The partings can be straight, side and curly:
- the direct parting divides the scalp of the head into two equal parts,
- lateral - into two unequal parts and most often passes from the frontal notches to the highest point of the head,
- The figured part consists of several straight lines forming various patterns.
Half round - shortened parting line. It can also be straight, side or figure.
Wave - This is the part of the hairstyle that has a smooth bend and is bounded on both sides by crowns, crowns is the highest wave line where the hair changes its direction to the opposite. The crown can be high and low, narrow and wide. The narrower and higher the crowns, the longer the hairstyle.
In relation to the face, the waves can be protruding and reverse. Speakers waves directed to the face and go beyond the edge line of hair growth. Reverse waves deployed from the face.
In relation to the parting of the wave are straight, oblique and transverse. Direct waves are arranged at an angle of 45 ° to the parting, oblique waves - parallel to the parting, transverse - perpendicular to the imaginary parting.
In size waves are wide and narrow, shallow and deep. The narrower and deeper the wave, the longer the hairstyle will hold. Optimum width of a wave is 2 cm.
Curl - strand of hair curled into a tube. According to the location on the head, there are vertical, horizontal, discharge curls. By the principle of cheating, curls can be twisted up, down, figure eight, half-eight.
Cold styling. Styling with a comb and fingers used for a long time. This style does not harm the hair. This method of laying allows you to widely vary the width and depth of the waves. Use the following order of operations:
- moisten hair with a fixer for styling and carefully comb from the forehead back. If there is a parting, then comb through the parting in the direction of the distribution of hair in the styling,
- introduce a comb at the hairline over the forehead or at the part and move the comb to the side (Fig. 3.2, a). Get the first half-wave. To hold the comb in the right hand in the third way (see subsection 2.1),

Fig. 3.2. Perform cold hair styling:
a - half wave, b - one wave, c - two waves
- with the left hand (with the index finger or the edge of the palm and the little finger) press the half-wave hair along the comb to the scalp. Move the comb in the hair slightly forward and move it in the opposite direction (Fig. 3.2, b). To remove the left hand from the pressed wave strand of the half-wave and press the second half-wave. One wave will turn out
- then again with your left hand to press the half-wave hair along the comb to the scalp, move the comb to the side. Get the third half-wave.
- movement of the comb back and forth and pressing the hair with your hand to repeat until you get the right amount of waves,
- having laid one section of the head in waves, switch to another, continuing to style the hair in the same way (Fig. 3.2, c).
When laying in some places, so that half-waves and waves do not move, they need to be fixed with clips and hairpins, but care must be taken to ensure that no hair is creased.

Fig. 3.3. Types of fixing flat rings
For very short hair on the back of the head, you can perform laying in the form of flat rings:
- on hair to apply a fixative for styling,
- twist the strand clockwise or counterclockwise with your thumb and forefinger and secure with one or two thin studs, clips, clips, invisible hairpins (Fig. 3.3),
- choose the width of the little rings 1,5x1,5 or 2x2 cm. Turn clockwise in one row and counter clockwise in the other, etc.
Hair styling with curlers currently not very relevant in salons and hairdressers. Nevertheless, there will always be customers who prefer this type of installation. In addition, modern types of curlers allow you to get beautiful natural curls, especially on long hair. Using various styling tools (hair styling), you can vary the appearance of the client. To do this, it is important to choose the diameter of the curlers, properly screw them and properly dry, and comb the hair. For example, combing the curls with brushes, you can stretch the strands, or you can simply make out the curls with your fingers, sprinkle with varnish, thereby obtaining a modern look. When using thin curlers curls will always be small and elastic. Medium hair curlers on short hair will simply give the hair pomp and volume, on medium-length hair - a large waviness, and on long hair - soft waves. Large curlers can be used to straighten curly hair. Laying with the help of curlers is always done on wet (for example, moistened with a composition for styling) hair.
Rules for curling hair curlers:
- before performing the wrap, the hair is divided into zones depending on the chosen arrangement of the curlers,
- the thickness of the strand should not exceed the diameter of the curler,
- the width of the strand should be slightly less than the length of the curler,
- in order to lift the root of the strand, the strand is pulled off approximately at an angle of 90 ° to the surface of the head,
- rotate the curlers so that the hair is evenly placed on the plane of the curlers,
- when winding, they maintain uniform hair tension,
- depending on the type of curlers, they are fixed with a rubber band or hairpin.

Fig. 3.4.Different schemes of hair curling on curlers

In fig. 3.4 shows the schemes of hair wrapping on curlers. After all the hairs are wrapped, the client is put on a hair net and seated it under the dryer. Before unwinding the curlers, they are allowed to cool down for a better fixation of the curls. To unwind the curlers start from the lower occipital zone, so that the hair is not tangled. Then proceed to combing hair.
At the request of the client after cheating, you can perform combing or tupirovanie hair. To make the hair more smooth shape, you can use gel or wax for hair styling. For longer preservation of the volume, the hairstyle is fixed with varnish.
Aerial styling. Hair styling with a brush and hair dryer is carried out depending on the length of the hair.
Laying a hair dryer to lift the roots with a flat skeleton brush is called a bomb. It is used in both men's and women's halls when performing everyday evening and model hairstyles.
The order of operations is as follows:
- strand seized brush at the root, against the growth of hair, for maximum recovery. A stream of air is directed to the strand tangentially to the head and fix the hair formed by the hall. Allow this area strands cool on the brush until completely dry,
- the whole strand is stretched along the length with a brush, directing the stream of the hair dryer in the direction of the lines of the haircut. After that, remove the brush from the dried hair strands,
- similarly, they continue to perform laying on the rest of the head, gradually moving from the occipital zone to the frontal one.
Using a round brush, shape the ends of the hair or straighten curly hair. This styling method is called brushing, it is applied only in the female hall.
Hair dryer convenient to style hair of any length. Hairstyles from short hair will be more luxurious and will last a longer time if the hair is moistened at the roots with gel, liquid varnish or styling foam.
Laying a hairdryer requires special care. It is necessary to dry the hair very carefully, trying not to let the already dried hair touch wet ones, to work out all the details clearly, at the same time creating the volumetric shape of the hairstyle and making sure that the air stream does not burn the skin. To do this, it is recommended to send a stream of air along a tangent line to the head, from the roots to the ends of the strand. After styling, comb your hair with a rare toothbrush.
Using a comb, flat brush and hair dryer, you can perform waves. To do this, hold the comb perpendicularly separated strands, introduce the teeth of the brush into the hair for a distance of two or three fingers and slightly move it to the right. So form the first wave. Then the comb is turned with its teeth up, tilted at itself and dried with a stream of air, directing it to the left. The second wave is obtained in the same way, changing the direction of the brush and hair dryer. The comb is moved to the left by 1 cm and is turned towards itself. The hair is dried with a stream of hair dryer directed to the right side.
You can start laying with the parietal head or parting. The brush is held parallel to the head, grabbing the strand with it, the hair is raised at the roots and slightly turned towards itself, after which the brush is moved away from the parting, gradually drying the hair along the entire brush. This technique is repeated several times to give the hair the desired shape.
You can wind long strands on a round brush and dry each strand, first from the outside and then from the inside. To do this, remove the strand with your left hand, slightly twisting the brush, as a result of which the hair is well fixed on the brush, taking the shape of a curl. In this case, the hair will be beautifully bent down without producing impressions twisted on curlers (Fig. 3.5).

Fig. 3.5. Hair styling with a round brush
Hot styling. Hair styling with electric tongs is performed only on dry and clean hair, as using electric tongs with wet hair is dangerous.And if the day before a lacquer or other fixer was applied to the hair, then this will greatly damage the hair structure - they will lose their shine, be dry and brittle.
The order of operations is as follows:
- strand to separate the comb, grab the forceps at the roots of the hair, place the forceps between the roller and the clamp,
- warm up by pushing the forceps along the entire length of the strand, and wind the hair onto the roller of the forceps. In order not to burn the scalp, put a comb under a strand of hair, which is currently twisted (Fig. 3.6),

Fig. 3.6. Hair styling
- hold for 20-30 seconds and carefully pull the tongs out of the curl. The direction of twisting with the electric pliers should be determined by the desired result of the future hairstyle,
- do this operation on all parts of the head, where it is desirable to get curls,
- getting curls, tubes, you can proceed to the final styling. Apply tiling, bouffant, hairpins, pins, etc., if necessary.
- fix haircut.
It should be noted that the daily use of electric pliers is not recommended, as the hair is very dry.
Combing and tupping hair. These operations are necessary for the design of some models of modern hairstyles. When performing both operations use a comb with teeth of different heights.
Combing is the dense whipping of the hair over the entire width and thickness of the treated strand. When combing, the strands are treated both from the inside and from the outside. Starting combing, first of all, a comb-tail separates the strand in the desired part of the scalp. Then grab the middle part of the strand between the middle (or large) and the index fingers of the left hand and pull it perpendicular to the surface of the head. Next, comb the hair strand at a distance of 5 - 6 cm from its base. Then, by moving the comb towards the base, the strands begin to comb. The movement of the comb down to the base of the strand stops at the first sensation of its braking, with each subsequent comb will stop further and further from the base of the strand. These movements are usually repeated several times, each time the comb is inserted 1 to 2 cm above. At the same time, the left hand holding the hair strand is also moved upwards, towards the ends of the hair strand. Move the fingers of your left hand upward along the strand and insert the comb into the hair should be consistent. The movement of the hand with a comb is performed as if in a circle. These techniques strand the hair treated on both sides.
Tupirovanie - beating hair only half the thickness of the strands. Tupirovanie can be represented as part of the combing. When performing tupirovanie strand of hair is usually not perpendicular to the surface of combing, and in the direction in which it will lie in the hair. At the same time, the comb is not introduced to the full thickness, but in such a way that its teeth do not protrude from the outside of the strand. This method of hair strand is treated only from the side that is inside the hair.
Fashionable curls and method of laying

Women tend to constantly change their image, curly hair - straightened with the help of an ironing, while straight ones experience hot hair styling with forceps. As a method of curling hair, hot styling has been around for quite a long time; today, stylists do not often use this method, but still, if you want to get elastic and shiny curls, you can use hair styling tongs.
Why this remedy is so popular with women .. >>
Moreover, today it is becoming more and more popular to create waves and curls, wayward curls and romantic curls. For the last styling, forceps are just perfect, but you need to know some subtleties, as the heating elements in the hair styling may not be as harmless as it seems at first glance.
For example, even a hairdryer should be used wisely, since hot air can significantly damage hair (“Laying on a medium hair with a hairdryer without damage”). Moreover, when it comes to hot tongs, you can not do without protecting the hair and some simple techniques for creating hot styling hair with forceps.
Preparing hair for styling tongs

To create hair styling, you need to prepare well and protect them as much as possible from the hot influence of curling irons. To do this, start with the usual cleansing, which is best carried out in three stages ("Daily hair care - simple secrets"). After the hair is well cleaned it is necessary to apply a balm or conditioner to create maximum moisture and nutrition.
The ideal solution to restore your hair in just 96% of the cost. The offer is limited .. >>
After this procedure, a protective agent is applied to the hair according to the type of hair, which will create a special film on the surface of each hair so that the hot styling of the hair with forceps holds well. You can also apply a special tool to create curls, but the only important point to keep in mind is not to use tongs in any case if the hair is wet or even wet from styling products or after washing.
Initially, this may not affect the appearance of the hair too much, but gradually the curls will become dull and damaged, they will not hold well and very soon you may need special hair masks (“Masks for dry, curly and unruly hair”).
It is best to do hot styling with forceps only for special occasions, as the constant use of hot forceps can significantly undermine the health of the hair.
Hair Curling Technique

If you want to get curls like in the photo above, then you need to gain some experience, since only very rarely do such elastic curls come out the first time. First you need to prepare the hair, how to do this, we described earlier and it is not difficult, especially since it is recommended to use everyday habitual means suitable for the type of hair. After the hair is applied to a special tool, you can proceed to the hottest hair styling with forceps.

Anastasia Sidorova has amazing hair of a fiery color. However, not so long ago, the girl struggled with hair loss.
First, the hair should be divided into several zones or parts: the side parts, the top and bottom. Next, you need to take in one hand a special comb, and in the other tongs, preheated to the desired temperature. With the help of a comb, you need to isolate the strand and gently grab it with forceps. Gradually, the curl is wound, forming the correct shape of the curl, you only need to unscrew the forceps each time, so that the curls turn out without kinks and are elastic and smooth.
Hot hair styling with forceps starts from the back of the head and the last chord should be strands near the face. They seem to complete the styling and allow not to miss a single strand. In addition, when hot styling when splitting hair into parts, you can use special clips for other strands, this will allow not to mix hair. After hair styling is completed, you can use hairspray with medium fixation so that the curls retain their elasticity and shine. You can also use natural hair styling products (“Natural Hair Styling Products”).
§ 5. Hair styling with tongs.
Hot curling (styling) hair with forceps has been known since 1871. The pioneer of this new type of hair treatment can be considered the French barber Marcel.
In the name of this master today are forceps for performing hot curling.
The significance of the new method of curling hair was so great that the famous French hairdresser Rene Rambo in his work “Curling curls” called the discovery of Marseille “the revolutionary art of decorating women with hairstyles”.
At that time, hair was curled “on the comb” and “curled”. But already by 1885 in the largest cities of Europe, hairdressers began to use Marseille tongs for curling. Together with the improvement of the professional skills of hairdressers in mastering the new type of tool for hair treatment by the method of Marseille, great opportunities opened up for even more beautiful and durable hairstyles.
By 1890, the hot curl began to prevail over the methods known at that time.
Currently, the arsenal of hair treatment products has grown immeasurably, but the forceps are still an important and necessary tool for the hairdresser.
Currently, conventional and electric tongs are used for hot curling.
Hot curling tongs consist of three parts: a roller with a handle, a groove with a handle and a pin connecting them. The junction of the two halves of the forceps with a pin divides them into a working part and handles.
Conventional curling irons are no different in design from the curling irons, which the French hairdresser Marcel first used in 1871. Currently, there is a whole set of tongs that differ only in the diameter of their working part. Their diameter ranges from 10 to 20 mm. Tongs with a diameter of 10-14 mm are used to generate waves (ands) and curl them into curls, with a diameter of 14-20 mm - only for curling hair into curls. Thus, forceps with a diameter of 10 to 14 mm are universal.
Such forceps are made from special heat-absorbing alloys that contribute to the long-term preservation of the temperature required for curling hair.
Electric forceps have a fairly significant diameter of the working part (20-25 cm), so they can not produce all the operations on the curl. However, they can perform hairstyles, almost no different from styling hair curlers.
Curling hair with forceps is a very time-consuming and responsible operation. It requires the hairdresser to have perfect tool ownership, attention and creativity. In the process of working with tongs, a hairdresser must be able to improvise, that is, to find individual solutions in each particular case. Perfect possession of the tool is a difficult task, which requires a certain amount of time and a lot of systematic training. It is not by chance that at the final examinations of hairdressers the most difficult is considered to be curling hair with tongs.
When hot curling hair, a hairdresser should have two forceps. Some, preheated to the desired temperature, the hair is treated until it cools, and the latter at this time are heated on a gas burner or in an electric machine. New tweezers can not work. To use them, it is necessary to carry out preparatory work - fat processing of forceps. At the same time, forceps should be strongly heated on the flame of a gas burner to brown-red, then immersed in a vessel with mineral oil, where the forceps cool down very quickly (within 1-2 minutes), then it should be removed from the oil and wiped with cotton wool. From such a procedure on the working surface of the forceps a thin protective film of caked oil is formed. In the future, when working with forceps, this film will protect the outer layers of the hair strand in contact with the forceps from overheating, while at the same time providing a more uniform heating of the entire thickness of the trapped hair with forceps.
In the absence of such a fatty film on the forceps, a layer of hair in contact with hot forceps may be singed. If such forceps are heated to a lower temperature, then the hair in the middle of the strand will not warm up sufficiently and, therefore, will not curl or curl very weakly.
Thus, the fatty film on the forceps is like a gasket, reducing the surface temperature of the forceps so as not to burn the hair, and at the same time, to some extent helps to maintain a certain temperature for a longer time.
The temperature of the forceps when curling hair can be determined as follows: remove the heated forceps from the heater, open them, put a piece of newsprint between the roller and the groove of the working part, and close them.
After 5-10 to pull out the paper and determine its condition. If no trace of forceps is left on the paper, then they need to be warmed up a little more, and then re-tested. If, after heating the forceps, a yellow mark remains on the paper, then they should no longer be heated.
The paper has a fairly low ignition temperature, and at a temperature of 130-150 ° C, it begins to turn yellow. This paper quality is used when checking the heating temperature of the forceps, since it is the temperature of 130 ° C that is the maximum allowable for keeping hair from burning and only slightly higher than the temperature necessary to ensure a high-quality curl.
Fig. 46. The main position of the forceps in the hand
The temperature at which the paper turns yellow is somewhat higher than we need. Therefore, the tongs should be cooled slightly. Usually for this use in two ways. In the first case, slightly opening the forceps in the right hand, they should be waved for a few seconds in the air, as a result of which the heated surface of the forceps will wrap around a large amount of air and the heat loss by them will be more intense than usual.
The second method is somewhat more complicated, but more effective. Forceps take the handle with the right hand, which is a continuation of the tongs of the forceps and, holding them vertically in the opened position, quickly rotate. To forceps only slightly cooled, but not supercooled, enough 8-10 revolutions of the groove around the axis, after which you can start the curl. If dense white paper is used to determine the temperature of the forceps, and not newspaper, you need to make 20-25 turns of the tongs groove around the axis of rotation.
In some countries, the temperature of the forceps is determined by a thermometer. But this method is not typical for hairdressers, as our industry does not produce such special thermometers. However, for information it is necessary to know that for curling hair, normal in structure, requires forceps heated to a temperature of 110-120 ° C.
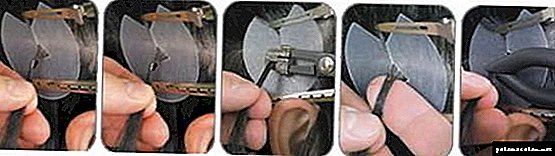
In order to have a good grip, it is necessary to work out professional skills, that is, to be able to properly hold the forceps in your hand, as well as quickly and easily turn them in your palm both clockwise and counterclockwise, simultaneously squeezing and unclamping the working parts.
Hold the forceps should be the right hand, and the handle of the forceps should lie in the palm between the thumb and index finger. The working part of the forceps (groove and roller) should be on the side of the thumb and index fingers, middle and ring fingers are located on the outside of the handles, and the little finger is inside, between their two ends.
During operation, the forceps are in constant motion, they are opened, closed, turning at this moment clockwise and counterclockwise.
Open the forceps should be the little finger of the right hand. To do this, you need to straighten the index, ring and middle fingers of the right hand, as a result, the lower handle of the forceps will be released. Simultaneously with straightening these three fingers is necessary?
straighten and little finger. At this point, the first phalanx of the little finger should rest on the inside of the handle of the forceps. At the moment of pushing the lower handle of the forceps with the little finger, their upper handle is held by the thumb of the right hand.
Close the forceps should be the reverse movement of all straightened fingers. The main load is carried by the ring and middle fingers, which squeeze the lower handle of the forceps.Simultaneously with this movement, the little finger should be pressed to the palm, so as not to interfere with the gripping of the handles.
When turning the forceps clockwise and counterclockwise, the thumb and index fingers of the right hand play the main role. Nameless and middle perform the secondary role.
Assume that you need to turn the forceps clockwise (if you look at the forceps from the side of their working part, they will rotate clockwise). Having given the forceps a starting position, begin to turn them with the index finger of the right hand, and press the handle of the forceps tightly to the palm with the middle finger. Ring and middle fingers are not involved in this movement. As soon as the handle of the forceps is tightly pressed to the palm and fingers are released, they should be pulled out in the direction of the other handle. At the same time, move the thumb to the opposite side of the handle held by it and start turning it clockwise, then grab the handle with the ring and middle fingers while continuing to turn it in the same direction. At the moment of rotation of the forceps with the ring and middle fingers, the index finger picks up the handle, freeing the fingers involved in the rotation, and presses it to the palm. The thumb at this time moves to the other side of the next handle. Thus, the cycle of finger movements is repeated.
The rotation of the forceps in the opposite direction is as follows: with the middle and ring fingers, pull the handle of the forceps from the palm and pick it up with the index finger. After that, move the thumb to the bottom handle, turn it up and press it to the palm. Next, the cycle of finger movements is repeated.
So, it is necessary to learn how to work with tongs in such a way as to be able to easily, without any effort, turn the pigs in any direction, leaving the working part closed, and also at the same time with the turns open and close them. The fingers should be sufficiently trained, as when curling the hair into curls, it is necessary to overcome considerable effort in unclenching forceps.
Train your fingers should be every day for 40-60 minutes. The required degree of skill is achieved in 10–15 days. Only after that it will be possible to proceed directly to curling hair with curls.
Curling curls
As we already know, despite the huge variety of existing hairstyles, most of them consist of such basic elements as waves and curls. These elements are the key to hairstyles. Changing their appearance or relative position, change the appearance of the entire hairstyle.

Fig. 47. Techniques for styling a hairstyle after a hot curling in the form of crumpled curls and rollers: a - styling a crumpled curl, b - styling a cushion of the frontal hair, c - securing the base of the crumpled curl with a hairpin, d - securing the crumpled curl with hairpins, d - machining the curl of a hair section on the neck, f - preparation for twisting the ends of hair in a curl
There are hairstyles made only with the help of waves or curls. In this and in another case, hairstyles can be very elegant and original. However, more interesting hairstyles, which combine waves and curls. The alternation of these elements, as well as their modification in certain areas of the scalp give each hairstyle originality and uniqueness. To be able to correctly combine the individual elements of curling with each other and on this basis to perform all kinds of hairstyles from the simplest to the most complex is very important for each hairdresser.

Fig. 48. Spiral-like view of vertical curls.
Curls in their form are divided into several types: straight (horizontal), sometimes they are called simple, oblique, vertical, crumpled, sloping, and also parallel in several rows.
Straight curls are horizontal. If they are arranged in several horizontal rows (one below the other), then such straight curls can also be called parallel.
Oblique curls are not parallel to either horizontal (straight) or vertical curls. On the scalp, they are usually located at an angle of about 45 ° both to the vertical and to the horizontal.
Wrinkled curls when styling hairstyles are laid in such a way that their bases have the form of waves, passing further to the ends of the hair strand into curls.
Bleed curls are performed only on long (at least 20-25 cm) hair. The ends of these curls down in a spiral.
For curling hair into curls, there are several ways: figure eight, up, down, etc.
Ideal conditions for any curling hair are those in which the hair is twisted onto a tool (forceps, hair curlers, bobbins, etc.) perpendicular to its axis of rotation. However, this is not always possible. So, for example, when curling short hair with forceps, it is not always possible to twist the hair perpendicular to the forceps axis with forceps. The hair is twisted like a spiral. And our task is to strive for such a state of winding, in which the distance between each turn of the spiral will be the smallest, that is, to approach the shape of the ring. This can be achieved by curling the hair in curls eight. Therefore, if hair length allows, you should use this method.
For curling curl thickness of the strands at the base should not exceed 4 cm. Otherwise, the hair will not be able to warm up evenly throughout the thickness. At the same time, the hair strand should not be too thin at the base (thinner than 1 cm). When curling hair into curls, one has to take into account not only the thickness of the strand, but also its length: the longer the hair of the strand, the thicker their layer will be when wrapping it into forceps. Therefore, you need to be able to vary the length and thickness of the strand. The longer the curled hair, the thinner the hair strand at the base must be taken for wrapping.
Approximately the relationship between the length of the hair strand and its thickness when curling the hair into curls is as follows:

Any curling hair requires a certain system when it is executed. Therefore, it is necessary from the very beginning of training to get used to a certain order.
Before you start curling hair with forceps, you need to prepare the required tools and accessories. Regardless of the method of hot curling, it requires: two tongs of the desired diameter, an electric furnace for heating them (if the tongs are not electric), as well as a metal or horn comb, that is, a comb that does not burn or melt due to the high temperature forceps. When curling hair into curls, thin hairpins or clips will also be required to secure each curl after curling. For training or training, it is necessary to prepare a strand of hair 15-20 cm wide.
Curl curls down is as follows (consider this method of curling hair on the training strands). Fasten the training strand of hair with pins or pins on a special pad or blank. Then it is good to comb it with a comb, first with rare teeth, then with frequent ones.
Before you start curling hair into curls, it is necessary to determine their number and the order of location on the strands. Suppose that we want to arrange on the order four locks in two rows, one under the other. Consequently, there will be two locks in each row. Determining their number and order on the strand, you can proceed to the curl. One fourth of the total weight of the hair must be separated (as there are four curls to be made on the whole strand). To do this, first divide the entire strand into two parts along its width, and then each of them again in half, but not longer in width, but in thickness (the first curl — the top one — must be made from the outer layer of the hair strand). Then, in the right hand to take the forceps (up to 110-120 ° C), and in the left hand - to strand the hair. When curling the hair into curls down, the forceps roller should be located at the bottom and the groove at the top.In this position, the forceps need to lead to the base of the strand, i.e., to the place where the first curl should be. At the time of the working part of the forceps, the forceps must be turned half a turn on themselves, i.e. the pubis forceps must be turned towards the base of the hair strand. With this position of the forceps, we will avoid breaking the strands in the place where it is grasped with forceps. This position of the curling forceps is mandatory at all stages of hair treatment.
Grab a strand of hair with forceps directly at the place where it is planned to place a curl or 1-1.5 cm above. As soon as there is hair between the groove and the roller of the forceps, squeeze the handles of the forceps slightly (but not completely) and pull them back. During the delay, the hair is not only ironed with hot forceps, but also warms slightly. As a result, the hair becomes more plastic. The straightening of the forceps from the gripping point must be made at such a distance so that you can make one or two turns and that they freely, without resistance, scroll in the lock. After that, the forceps can be gently pulled out, so that the ends of the hair remain in the middle of the curl. A hot curl is fixed with a clip (clip) so that it does not sag under its own weight.
Having fixed the curl, you can proceed to curling the next one, etc. At the same time, you should pay attention to the fact that all the curls of the first row are located on one straight line (horizontally), and the curls of the second row are below them.
In everyday work, you have to arrange the curls in a different order (depending on the hairstyle). However, in the initial stage of training it is necessary to achieve exactly the symmetrical arrangement of the curls.
Curling curls up differs from the above-described method of curling the curls down with only a few details.
The main difference is that the forceps should be brought to the strands deployed on the contrary, that is, their groove should be at the bottom and the roller at the top.
At the time of grasping the tongs, the tongs must be turned in such a way that the groove is on the master side and the roller on the base side of the strand. The remaining techniques are similar to those described above. Grabbing a strand of hair with tongs, you need to turn them up one full turn, and then start working on the curl at the point where the curl should be located. The fingers of the left hand at this time hold the ends of the hair, slightly pulling them.
Now you need to work out the curled part of the hair. To do this, use the little finger to slightly open the forceps and then close it. These movements should be repeated all the time with sufficient speed, since at the moments of frequent opening and closing of the forceps, the hair is better distributed over their working surface, lay evenly, evenly warming up. When working with forceps, you can hear a light and frequent clapping. The frequency of these sounds helps determine the degree of mastery of the barber.
Sometimes it is very difficult to slightly open the tongs with one little finger. In this case, opening the tongs helps the ring finger, and the middle finger at this point should perform the functions of the ring finger.
As the forceps clap, it is necessary to make a gradual pull from the base of the strand so that other parts of the hair strands that have not yet been processed fall into the working part of the forceps (between the groove and the roller).

Fig. 49. Curl curls up: a - grab strands of hair with forceps, b - made the first turn of the forceps (fingers of the left hand hold the ends of the hair strands in a tense position)
The forceps should be drawn off to a distance that will allow them to return to their previous position with one full turn of the forceps, that is, to the place of their initial capture by a strand of hair. Then these movements should be repeated in the same order until the ends of the hair are squeezed between the groove and the roller. At this point, the delay should not be done.
Finish curl curl should be as follows: all the time slapping with forceps, gradually turn them towards themselves in the direction of curl curl until, until they simultaneously pull it off. Curling the curls up, they should be placed on the strand in the same order as when curling down.
Curling hair curled eight is as follows (consider the training strand). A hair strand of at least 20 cm in length should be fixed on a blank or a special pillow, and then combed so that the teeth of the comb pass from the bottom of the strand to the ends. Having determined the number of curls and their location on the strands, separate the necessary part of the hair for curling one curl.
The separated part of the hair is taken in the left hand. Then forceps warmed to the desired temperature are brought to the stage. The tongs groove can be either top or bottom, depending on which way we curl the curl, up or down. When winding curls down the groove is on top and the cushion below.
Then, just as when curling the hair down, the working part of the forceps to grab a strand of hair, turning them in half a turn on themselves. As soon as the hair strand is grasped by forceps, it is necessary to immediately turn them around, stopping them in such a position that the roller of the forceps is turned towards the base of the strand, and the groove towards the master. The left hand at this moment slightly pulls a strand of hair, pressing them against the forceps.
Then work the curl in the same way as when curling the curls down. After warming the strands over the entire thickness, pull the forceps away from the grip area of the strand at a sufficient distance and make the next turn as quickly as possible.
At that moment, when the forceps begin to turn in the right hand, with the left it is necessary to start the ends of the hair strand down from the back side of it, thus forming an eight figure.
Therefore, if at the first turn of the forceps the ends of the hair, turning around them, passed from the left side of the strand, then at the second turn they should pass to the right. Thus, with each new turn of the forceps, the ends of the hair change their position, being now from the left, then from the right side of the direction of the twisted strand. The ends of the hair at the same time all the time are in the middle part of the working surfaces of the forceps, which contributes to a better curl curl. The ends of the curl should be worked out in the same way as is done with other ways of twisting the curls.
Twisting one curl, you can proceed to the implementation of the second. In this case, the strand must be captured at the same height as the previous one in order to complete this horizontal row of curls.
Curling of curls with the eight is mainly intended for the manufacture of vent or crumpled curls, as they require quite a considerable length of hair (20-25 cm or more). To let the curls upright in the hair, it is recommended that the curling tongs be placed vertically. Bleed curls can also be performed with a horizontal arrangement of forceps, if the curl is performed on sufficiently long hair (30 cm or more). In this case, they will hang down in the form of a curved spiral, which looks very impressive.
The classic way of curling the curls is somewhat different. At the same time, the tongs should be held vertically, with the handles down, and the hair should be twisted on them in a spiral fashion. The ends of the hair spiral, wrapping around the working part of the forceps, located on the side of their lock.
In addition to all the above methods of curling curls and their types, there is also the so-called curl of parallel curls in several rows. You can execute such curls using any of the existing curling methods. Preparation strand to work is the same as in any other way.
If it is necessary to observe their parallelism when curling the hair just in curls, then this condition is paramount when curling so-called parallel curls.When practicing the skill in this kind of perm, it is necessary to place at least three strictly horizontal rows on the strands (three locks in each row).
Outlining the place of each curl and combing the strand, you can begin to curl it. The parallelism of the curls is provided mainly by the capture of the working part of the forceps of the first strand of hair. In addition, it is necessary to ensure that when processing each curl, the distance that the forceps are pulled is the same on each curl. Subject to these conditions, parallel curls will be provided.

Fig. 50. Making curls in a hairstyle: a - preparing the occipital hair strand to twist into a curl, b - styling a curl in the form of a bundle, c - securing the base of the curl with a hairpin, d - preparing a strand of hair on the forehead to twist into a curl
Curling of all rows of parallel curls should be carried out only by one of the selected methods. As soon as the first horizontal row of curls is fully completed, you can begin to curl the second row. Each subsequent row of curls should be located under the previous one, with no gaps between them.
Regardless of the way the hair is curled into curls, they are decorated with the same methods. Therefore, we consider briefly the general methods of registration of curls.
Make curls can only be after they are completely cooled. Then you need to take a curl in your left hand, straighten it and comb it with a comb at first with rare teeth, and then with frequent ones.
In order to make the curl more elastic and lush and last longer, it is tupulated from the side of the strand that will be internal in the curl. After that, put the curl with the inner side on the palm of your left hand, and in the right hand take a special hair brush, lightly oiled with petroleum jelly or briolin, and brush the outer side of the curl with it. Its thoroughness depends on the thoroughness of brushing the outer side.
Curl curl depending on its type can be the fingers of both hands or the fingers of the left hand, the end of the comb with a tail.
Curling hair in waves
This type of curling in hairdressing practice is carried out in two ways: on yourself and on your own.
A way to curl hair from yourself is more difficult. However, the ability to use it in the work opens up more opportunities to perform various hairstyles. Of particular importance is this method of curling when performing high hairstyles, in which the wave line passes along the edge of the hair growth of the entire hairline of the head. In such hairstyles, all hair must be combed upwards, towards the top of the crown or the parietal part. It is necessary to carry out the perm from the edge of hair growth gradually, wave after wave, rising up. In this case, about half of all the work is done in a way from itself, and the second half is done by itself.
The way you should work out the hair located on the back of the head and side of the head behind the ears. Of course, you can make a howl hairstyle way to yourself. However, this is practically unacceptable, as it would have to curl the hair in a very uncomfortable position for the client.
If during curling the hair into curls the main part of the work is done with the right hand, in which the forceps are located, and with the left one they help, then with the wave of the hair, waves with the left hand perform not less important operations than the right. In the left hand is constantly comb, which together with the forceps form the waves.
The comb should be taken in the left hand by a device in which its pickup is facing the palm. Place your thumb and little finger on one side of the comb and the rest on the other. When turning the teeth of the comb to the master, move the thumb towards the butt of the comb, and when turning the teeth in the opposite direction - towards the ends of the teeth. This movement of the fingers and combs must be worked out quite clearly. It is absolutely necessary for the proper capture of the strands of hair intended for curling.
Therefore, before proceeding directly to the curl strands of hair waves, you need to practice in capturing her comb. During this workout, take a comb in your left hand. A strand of hair should be pre-prepared and combed. Then, moving the thumb of the left hand in the direction of the teeth of the comb, turn it away from you. In this position, bring the comb to the base of the hair strands and insert the teeth of the comb into it. However, they do not have to go through the whole strand.
To grip the hair with a quick movement, move the thumb to the side of the hair comb, turning it to the side in such a way. At this point, slightly expand and left hand, so that the teeth of the comb were not slightly parallel to the general direction of the hair in the strands. Thus, the hair lying on the teeth of the comb will not be able to come off them at the moment of lifting the strands of hair for their grip with forceps.
Having seized the hair strand with the comb, lift it by 2-3 cm and bring the forceps to it (the tongs groove should be turned towards the master, and the roller towards the base of the strand). The handles of the forceps lie horizontally in the palm. Tongs are brought to the section of the hair strand, located 1.5-2 cm higher than the comb, which supports the strand in a slightly raised position. Then slightly force the tongs toward you so that the top edge of the groove is slightly above the roller. With the forceps open, move them to the hair with your right hand to the left so that the hair is between the groove and the roller. Lightly clamping the hair strand with forceps at a distance of 1.5-2 cm from the comb, pull the working part of the forceps to the comb. At this time, the tongs should be turned to the working position, i.e., with a groove towards the master, and with a roller - towards the base of the strand. The forceps reversal should be completed by the time they touch the comb. Simultaneously with the turn and the delay gradually strengthen the clamp of the forceps, so that to the initial position, i.e. the comb, it was the greatest. Simultaneously with the delay, turn and strengthening of the clamp, forceps slightly slightly to the right parallel to the axis of their rotation.
The movement of the forceps to the right parallel to their axis of rotation occurs simultaneously with the movement of the comb to the left, also parallel to the axis of rotation of the forceps, but directed in the opposite direction. The displacement of the hair strand with the forceps to the right is compensated by their displacement with a comb to the left. Thus, the overall direction of the hair strands remains almost constant. As a result of such oppositely directed movements of the forceps and a comb, a wave line is formed. Do not confuse crowns with the middle part of the wave. The crown is the border (line) between two waves, and the middle part of the wave (as if its invisible line) passes in the place where the hair in the wave changes its direction.
The crown is formed at the moment when the forceps meet with a comb. In the place where the crown was formed, the hair sharply changes its direction to the opposite. It turns out a smooth line (crest) of the wave, after which the full wave begins. It must be said that the crown itself is a very important element in the hairstyle. Therefore, when training in gripping a strand of hair with a comb and forceps, the crown position on the strand should not be allowed to change all the time.

Fig. 51. Oppositely directed movements of forceps and combs at the time of formation of the crown.
Here it is necessary to work out the accuracy.
Curling your hair in waves is that the process of working in this way goes towards itself, i.e., the master. When processing each wave, forceps and a comb, you must always pull the strands from the base to its end.
Starting training at the training strand, it must first be combed.
Then heat the tongs to a temperature.
110-120 ° C and check the degree of heating forceps known to us by the method. Then a strand of hair to raise the comb and grab the forceps, pulling them to the formation of the crown wave.As soon as the tongs touch the comb, they need to be rotated slightly, keeping the overall direction of the twist. At the moment of pulling the comb further down the strand, an additional combing of it occurs. As a result, the hair is better distributed over the surface of the forceps, which provides a better and more beautiful curl.
Combing hair from the crown wave is carried out. as follows: after the tongs were slightly turned, touching the comb, a small portion of the crown strand protruded through its teeth. Consequently, the comb was no longer at the crown itself, but somewhat lower. In order to comb through this area of hair a few more times, the forceps must be slightly turned in the opposite direction, and the comb must be transferred again to the crown. Next, move the forceps and comb to repeat.
As soon as the hair section from the crown is combed to a sufficient degree, it is possible to intercept the forceps. To do this, strand the hair must be supported by a comb, and the tongs unclenched and transferred through the crowns. The next capture of the hair strand can be made both at the first crown from the other side, and in the middle part of the next wave, as well as directly at the next crown. Since all these methods are somewhat different from each other, below are some information about each of them.
Let's start with the fact that we need to capture a strand of hair directly at the first crown. To do this, strand of hair should be supported with a comb in the same position in which we left it, unclenching forceps. Comb at this point is 2-3 cm from the crown. Then turn the tongs 180 ° so that their groove is facing towards the base of the strand, and the roller towards the master. In this position, forceps slightly open and, passing a strand of hair between their groove and the roller, bring them to the crown. It is necessary to ensure that the crown ridge is parallel to the forceps and does not fall into their working part. Otherwise, the crown will be broken and the smooth wave line is broken.
At that moment, when the master begins to compress the working parts of the forceps, it is necessary to start moving them along the axis of rotation to the left. This movement of the forceps is very important, because it manages to ensure a smooth exit of hair from the crown to the wave. Simultaneously with the movement of the forceps to the left parallel to their axis of rotation, the comb moves the gripped strand of hair to the right. This movement of the comb ensures a smooth bending of the wave line and the place of the next crown is outlined. Thus, the forceps and the comb move in opposite directions. The movement of the comb is also parallel to the axis of rotation of the forceps.
Work out crowns from the comb should not be. As soon as the next crown is outlined, it is possible to slightly loosen the forceps and, without pulling them completely out of the strand, move them to the middle part of the resulting wave. During the movement of the forceps across the wave from the crown, they must be rotated 180 ° so that from the base of the strand there is a roller of the forceps, and from the side of the master - a groove. In this position, the tongs are ready for operation. They need to grab a strand of hair on that part where the wave, bending, changes its direction (this is approximately in the middle part of the wave). Squeeze the strand to delay, not reaching 1-2 mm to the line of the next crown. In this place, the hair must be worked out well, at the same time combing the next section of hair strands with a comb, as described above.
After the crown of the wave has been sufficiently developed, it is possible to proceed to the implementation of the following waves, following the same order of their processing, except for the processing of the last wave. This feature is as follows: in the ideal case, the size of the last wave should be the same as the waves on the entire hair strand. However, in practice, to calculate the number and size of the waves along the entire length of the strand is not possible. Therefore, when processing the hair of the last wave, you need to see how it fits into the overall pattern of the hairstyle.It is necessary to strive to ensure that the tips of the hair of the last wave enter the crown of the wave in the middle part of the strand. To do this, having processed the last crown on both sides of the strand, move the forceps to the middle part of the wave in a manner already known to us. Then, by frequently tapping the forceps, pull them to the end of the strand with a movement that repeats the desired bending of the wave. Patting forceps need to continue until such time as the last hairs of the strands do not come out of their working part.
The tips of the hair must be worked out in this way necessarily, otherwise against the background of the curled part of the hair, they will appear straight and therefore protruding. On * this process of curling hair waves with a delay can be considered complete. However, it is possible to curl hair in waves without a delay. In addition, it is sometimes necessary to get a sharp wave line.
In order to get a sharp wave line, it is necessary when processing the second (from the base of the strand) crown to make one full turn of the forceps away from you and to give time for heating a rather thick layer of hair. While warming the strand, the forceps need to be turned slightly towards themselves and away from themselves (patting them), and combing the hair in the left hand with a comb. Thus each cron is processed.
This method of wave curling without delay is not much different from the method of curling with a delay. The only difference is that the hair is treated directly at the crown on both sides. The middle part of the wave is not processed with forceps. With such a perm, the wave line is more natural, but less durable.
In the secondary processing of the waves, the method of curling hair caught by the forceps at the crown is used for one complete revolution. When processing each subsequent wave comb it is necessary to pick up additional hair of the lower layers. At the same time, the height of hair lifting should be minimal on any part of the hairstyle.
Curling your hair in waves from yourself is necessary when performing some hairstyles. This method of curling hair is as follows. The prepared strand of hair is combed up, if it is attached to the blank. However, for practicing the first skills it is more convenient to use a special pad, since it is possible to position the strand on it horizontally and so that its base is turned towards the master. Then carefully comb the strand comb, first with large teeth, and then - small. After that, you can proceed directly to the curl. This method of curling is like a mirror image of the method of curling on itself. This means that if we looked in the mirror while curling our hair in a way towards ourselves, we would see exactly the same movements of the forceps and combs, which are produced when curling our hair in a way from ourselves. The left and right hands perform the same operations, but their movements are directed oppositely to those movements that are produced in the first method of curling. Therefore, it is only necessary to develop the automatism of the work of the left and right hands.
Methods of combing the hair section intended for curling, as well as the treatment of the crown of the wave are similar to those described above.
At the time of grasping the hair strands with a forceps, one should not forget that they should be moved slightly to the right parallel to their rotation axis, and the comb should deflect the hair strand to the left. These movements are very important for the formation of crown and wave.
At the end of the treatment of the first crown, you need to intercept the forceps and continue the processing of the hair strands in one of the selected ways.
The most important difference, of course, in this case will be the movement of the forceps and the comb. As the wave after wave is processed on the strands, the forceps and the hairbrush move away from the base of the strand to the ends. With the curling method on itself, the tongs and the comb also move the strands from the base to the ends, however this movement is directed towards the master, and with the method from itself — away from the master.
Wig hair wig
Wig is essential as a training tool for practicing skills in the implementation of various hairstyles. But when approaching the perm of the wig, the student should already have a good command of the tongs and be able to carry out all the elements of the curl that make up the hairstyle. The wig curling trainings are the last step in the process of learning to curl hair in a hot way, after which the student will have to directly serve clients. Therefore, when curling a wig, it is necessary to work out not the elements that make up the hairstyle, but the location of the waves in relation to the eyebrows, cut eyes and other parts of the face. In addition, when curling a wig, the necessary skill is worked out, which makes it possible to eliminate injury by hot forceps of the client’s scalp.
Before starting work on curling a wig, it is necessary to think about the future shape of the hairstyle, since depending on the shape of the hairstyle, the number of necessary waves, curls, their location in the hairstyle, and the presence or absence of partings is determined.
Mainly standard wigs are used for training purposes. Due to the fact that each client has individual features in the shape of the head, the outline and oval of the face, the density of hair, etc., it becomes necessary to work out different forms of hairstyles on a wig. Hairstyles can be with partings and without partitions. Depending on the shape of the head, the outlines of the face, the thickness and edges of hair growth and even the color of the hair, the waves can be small or large. The number of facial (protruding) waves can be 2, 3 and more.
Hairstyles with straight and side partings can be straight (parallel to the parting) and with oblique (at an angle to the parting) waves.
In a hairstyle with straight parting, the facial waves on both sides are usually arranged symmetrically. You can make a hair with two protruding waves (frontal and temporal), opening the ears. Hairstyles can be with three protruding waves: frontal, temporal and facial. In this case, the last wave, the front one, covers the auricle (if each wave is of medium width, in the case of small waves, the last wave may not completely close the ear).
In hairstyles with side parting, the number of protruding waves on the one hand depends on the number of protruding waves on the other hand. If on one side of the parting there are three protruding waves, then on the other there should be two. If on the one hand there are two protruding waves, then on the other there should be one protruding wave.
Hairstyles with side parting can be with direct waves on both sides of the parting, with oblique waves on both sides, as well as with oblique waves on the larger side of the parting and straight lines - on the smaller side. On the larger side, the first wave can be facial or reverse. Depending on the number of waves, the ears may be open (two waves on the larger side and one on the smaller side) or closed (three on the larger side and two on the smaller side).
In all hairstyles with partings, the waves behind the head should be joined only by those that have the same direction: even on one side and odd on the other. The wave line around the crown or at the end of the parting should be worked out in a semicircle at the same distance from the crown so that the crown is the center of the semicircle. It is necessary to work when performing this line only the ends of nippers.
Hairstyles without partitions can be with protruding waves and with waves from the face, with open or closed ears, symmetrical or asymmetrical.
In a hairstyle with protruding waves you first need to perform the "crown" and only around it a continuous line to curl the waves. The waves on the crown and crown should be wider than that of the face. In such a hairstyle, the waves can be located symmetrically on both sides relative to the place of the intended parting or slightly shifted to one side or the other. In this case, on the one hand, there may be one more wave than on the other.If the "crown" is located on the left side of the intended parting, then more waves will be on the right side, and vice versa.
A hairstyle with waves from the face is recommended for those with a beautifully defined forehead line. If the frontal grooves are deep, i.e. there are deep bald spots, then this hairstyle is not recommended. Waves from the face should be performed perpendicular to the intended parting. A crown is also performed here around the frontal protrusion, but its semicircle has a much larger diameter. The line of "crowns" then goes parallel to the edge of hair growth. Thus, the first line of the wave covering the ear is executed. The second line of this wave (kroons) on the other side is the first line of the next wave, here it also closes the ear. This hairstyle looks especially good if the hair on the top of the head is gathered in a bun and curled into curls.
All of the hairstyles listed depending on the length of the hair can be finished differently. For example, with short hair, you can perform the entire hairstyle with waves. Of the medium length hair, the hairstyle can be combined (in front - the waves, in the back - curls), with long hair, the front part of the hair is most often curled, and the hair of the back of the head is placed in a bun.
Curling the hair of a wig, you need to work out various techniques for performing flat and deep waves. To obtain flat waves, the wave is performed without a delay. In this case, at the time of the study of the crown of the wave, the forceps should be turned aside as little as possible from oneself or onto oneself. When turning the forceps, you must stop them in such a position so that hair does not break. Thus, to obtain plane waves, the crown wave processing is performed with the smallest rotation of the forceps.
To perform sharply pronounced deep waves, the rotation of the forceps when processing the crown should be as large as possible. The first treatment of the wave is carried out as it was described above; for the secondary treatment, it is necessary to work out the lower layers of the hair. In this case, the waves of the lower layers should coincide exactly with the waves of the upper layer. To start the secondary processing should be as follows: the first crowns to work out the same way as the first processing. Then, when the forceps are unclasped to intercept the next crown, with a comb, grab the lower layers of hair along with the upper ones. When the strand is slightly raised, loosen the tension of the hair slightly (i.e., help them slightly spring down) by moving the comb towards the base of the strand. As a result of this movement, the wave line will be clearer and this will help to grab the strand with forceps in exactly the place intended for this. Then the tongs lead to the crown so that their roller is on top and groove on the bottom. At the same time, use the tongs groove to grab a strand of hair raised by the comb and turn the forceps a full turn, at the same time producing all the movements necessary with a forceps and a hairbrush in this case. Work on the krone from both sides, and then proceed to the next krone. When working on subsequent waves, you need to constantly make sure that the left hand with the comb does not lift the hair higher than is necessary to grip them with forceps. This condition must be observed to ensure that when you make a hairstyle, the waves of the upper layers of hair coincide with the lower ones.
To study the hair for the entire thickness of the layer, you can use another method. The developed hair should be separated with a comb and spread forward, while the lower layers will open and become more accessible for curling. In order to obtain a deep line, waves are sometimes used in such a manner that the waves will visually appear deeper. This is achieved by reducing the width of the wave: the narrower the wave, the more its depth will appear. This technique is especially recommended when curling too soft and sparse hair.

Fig. 52. Elegant hairstyles from long hair, made with forceps in the classical style
Thus, to obtain a deep wave line, it is necessary to work out the hair for the entire thickness of the strand with the greatest turn of the forceps.
When performing waves with forceps, the normal position of the forceps is parallel to the surface of the head, i.e., that portion of the head whose hair we process. When working through the "crown", this situation changes somewhat. Nippers settle down at an angle so that only their ends participated in work. After all, only the ends of the forceps can work a sharp bend "crown". That is why it is necessary to use only their ends. Treat the crown should be small strands. The width of the treated hair strands in each case may be different. It all depends on what kind of "crown" in size we need to perform. The smaller the diameter of the "crown" semicircle, the smaller the width of the hair strand should be processed with each new grip forceps. Ways to get the crown "crown" is similar to how it is done with the usual curling of the first crown. When curling the "crown" you need to carefully and beautifully perform this part of the work. On how well it will look, depends on the overall appearance of the hair. After all, she is in the foreground of her hair and all the attention of the outside gaze is focused on her.
Before you start curling long hair, it is also necessary to determine the hairstyle and imagine it in its finished form. Performing a haircut from long hair, the master should be able to perform the most various elements of hairstyles with a short haircut.
Hairstyles from long hair can be with or without parting of any type, with protruding or reverse waves. The number of waves on the left and right sides of the head can also be very different.
The location and direction of the waves in the hair depends on the shape of the beam. When styling the hair in a bunch, various options can be used: a bundle of curled hair, a bundle of curls, etc.
More Articles


Tail hair

Hair weave


Haircut Boxing and Halfbox
5 Comment on "Hot hair styling."
Well, if the hair dryer is equipped with an ionization function, thanks to which the hair can acquire a healthy shine, and their static electrification will decrease. After styling such a hair dryer, the hair in the hair will be smooth and shiny.
Hello, great topic. It is necessary to consider in more detail.
Ceramic and tourmaline irons are considered the most benign. For this installation should also purchase a suitable tool. If you shirring hair with an iron, then do it in the direction from the roots. You should not use the iron daily, as even the most benign apparatus eventually dries the hair.
It is necessary to form a hairstyle from the back of the head upwards, that is, the last head should be dried. Separate a strand of hair with a comb with sparse teeth on a horizontal line, comb it with a large brush and dry in the direction from the roots to the ends. The ends of the hair strands for shaping are held in a desired position with a round brush, while finally drying them with a hairdryer. For laying the ends of the ideal function of the cold airflow.
There is something in it. I agree with you, thanks for the help in this matter. As always, all ingenious is simple.
Long and short curls - nuances of hot hair styling with forceps

Sometimes, it seems that doing styling for short hair is somewhat easier than for long hair, and this is not without logic. But hot pliers for long hair done a little longer. The main thing is to properly prepare the hair for styling and then act in stages so that the curls turn out to be elastic and springy. For long hair styling is done in three stages:
- division of hair into zones
- application to the strands of protective agent
- perm, hot hair tongs starting from the nape.

It is important to properly clamp the tips of long hair and hold no longer than a few seconds.For short hair the same rule applies, the only difference is that the hair can be styled from any zone and it is not necessary to emphasize strands at all. And what are the secrets of laying with tongs?
Hello girls I can not help but brag - I was able to turn my short and brittle hair into luxurious, long curls. Houses!
This is not a build! My real hair. Without super styling and other “tricks” - as it is! Impressive? So my story. >>>
5 hair styling techniques
Curls - a strong argument in the struggle of women for their irresistible. With their help, you can create amazingly beautiful hairstyles. What should be the device to create curls, what ways they can be put and how to curl the hair with forceps?
 Tweezers can make a miracle on your head
What you need to know about curling tongs?
Tongs is a tool for creating curls. But since the surface heats up when laying, it is necessary that the head be dry, otherwise you can burn the strands.
Hair curlers are selected depending on the type of hair:
- It is recommended for owners of fine hair to purchase a tool with the ability to supply cold air so that the heat treatment can be alternated with a cold mode of laying.
- For hard hair, models with good performance indicators are suitable so that the contact time with the strand is small, but during this time it has managed to heat up.
- For any types of suitable device with the possibility of ionization, so that during the laying was performed humidification.
It is good if the instrument has a lot of settings for adjusting the temperature so that you can choose the most delicate mode for yourself.
- The magnitude of the curls depends on the diameter of the working surface of the device. Therefore, choose a device with a large number of nozzles,
- Heat the pad according to the instructions. Do not use it until it is hot,
- Wear a glove before curling. It is necessary to not accidentally burn yourself.
When performing styling should consider the following points:
- The angle for the tension curls. The standard angle is 90 degrees towards the turning axis of the device.
- The thickness of the strands. It is determined depending on the length of the hair: for short hair - as when using hair curlers (but no thicker than 4 cm), for curls of medium length - one third thinner, for long hair — in half thinner than for short hair.
Curling methods curls
 Choose a method of hair wrapping; there are several of them.
To twist the hair on the forceps can be two methods: horizontal and vertical. In the first method, there are three options for curling: up, down, figure eight, in the second, two options: spiral or with curls.
Horizontal methods of hot hair styling: use babyliss and other models
When performing horizontal laying, hold the curling iron more on the inside than on the outside, this will make the strands springy.
- Laying down. Used to design different types of hairstyles. Curls are made small and light, as the curls of a round shape make the hair "heavy" in appearance.
- Laying up. Forms light hairstyles, in the form of a large wave. Separately from other variants of the wave, this technique is almost never used, more often it is used in combination with other variants.
- Laying eight. Forms strands of spiral shape, you can create "crumpled", combined curls. The tips of the strands are located in the center of the working area of the curling, due to which the curl becomes stronger. This option applies only to hair of medium or long length.
 Use 8 ku if the hair is medium length
To curl hair with forceps down:
- Take a strand, comb, pull at a right angle from the head,
- Fix it in your left hand, and the appliance - in the right,
- Open the tool, direct it to the strands and clamp it with the tool groove at the top, and the roller at the bottom,
- Heat up: gently pull the device along the strands, heading for the tips.Do not let go of the tips, keeping them in the curling.
- We twist hair with the help of forceps towards the roots, a spiral should form around the device. In order not to burn yourself, place a comb at the roots,
- Hold for 5-8 seconds to warm up,
- Open the curling iron, release the resulting lock,
- Clamp the strand to let the hair cool.
Laying up is done in the same way, only in the third step, the grooves of the forceps are placed at the bottom, and the roller - at the top.
 Curly hairstyle
To make laying eight:
- Comb your hair well so that the hairbrush slides all the way non-stop,
- Take one strand in your left hand, instrument - in your right,
- Open the device, lock the lock. Turn the curling half way to you,
- Rotate 360 degrees, point the roller toward the tips, and groove toward you. When doing this, stretch the strands,
- Stop for 5-8 seconds
- Gently pull the curling iron away from the grip area, take another 360 degree turn,
- Use your right hand to rotate the tool, and with your left hand, point the tips down on the other side of the curl, forming a figure eight,
- With each new revolution, the tips should be in the same position: if during the revolution the tips were located on the right, during the next revolution they should be on the right,
- Process curls at the traditional method, as with other styling options,
 When forming the following curls, grab them at the same level as before.
Vertical styling methods using Rowenta cf 6420, Valera, Atlanta ath 935, Bosch
Keep curling upright, curling curls in a spiral. Make out your hair after curling and cooling curls. Strands can be directed to the face from one side or from both sides.
Important: when creating a curl on the right side, direct the device with the handle down and curl your hair from the device's lock. When creating a curl on the left side, direct the device with the handle upward, and twist from the end to the tool.
To do vertical stacking:
- Take one strand and carefully comb it,
- In the left hand, take the hair, and in the right hand - forceps,
- Open the tool by placing the curler in an upright position. Lock the strand and gently point the device to the tips,
- Make a curl, taking the device from the end of the strand,
- Turn the curling iron vertically and twist the strand spirally, moving from the ends to the roots,
- Wait 5-8 seconds, turn the tool in the opposite direction, open the tongs and gently pull them out.
Having curls, do not use a comb, and immediately put them in her hair and treat varnish.
 A set of tools for tongs come in handy
Creation of curls with the help of tapered forceps-corrugation philips: laying technology
This tool helps to create a wrinkle effect or to make alignment. For this purpose there are special plates. It is also used to curl all the hair at once.
To wind the hair with crimping tongs:
- Wash and dry hair, polish and comb it,
- On the temples and the back of the head, clean the hair to the sides, fix the rest with a clip,
- Take a strand of parting and hold it at the desired height between the plates,
- Wait 5-8 seconds and open the device, gently guiding it down the strand,
- Follow steps 3 and 4 with the rest of the strands,
- Take the next row and curl the strands out of it in the same way.
After curling do not need to use a comb.
Features care for medium, long and short hair when working with forceps
It is believed that curling and other electric styling tools dry hair. But this is only due to improper use of devices.
- Before curling hair with forceps, except for shampoo, use conditioner. This will help keep your hair healthy
- Once in 7 days, apply a mask to restore, it should match the type of hair.These are usually moisturizing and nourishing masks,
- In the evening, comb it with a massage, it is useful for the scalp and, accordingly, for hair,
- Before laying, use a protective agent against high temperatures.
 The main thing is to keep your hair healthy